Introduction to Seahorse University
A path to becoming a program (smart-contract) developer on Solana for Python developers. You don't need any degree or web 3.0 experience.
About this course
This course provides an introduction to the uninitiated in web3 to Solana development. Solana development has a steep learning curve because:
- Solana Programming Model: Solana account model is not for the faint hearted. But once one gets the hang of it, it’s one of the most excited frameworks to work with.
- Rust Lang: the language used to code programs or smart contracts on Solana. Rust is not the easiest language to learn. Seahorse lang is built to bypass one of these two barriers, more specifically the latter.
Developers gain Python's ease-of-use, while still having the same safety guarantees as every Rust program on the Solana chain. Low-level memory problems are handled by default, letting you worry about the important stuff.
What you'll learn
- Gain an immersive understanding of the Solana account model
- Understand how to write Solana programs using Python and Seahorse lang
- Learn how to make full-stack decentralised applications using Python and Javascript
- Learn the very basics of Anchor and Rust using Seahorse lang
Prerequisites
- Python programming skills
- Basics knowledge of Blockchain technology
Codebase
The code for the programs as well as this Markdown Book (mdbook) can be found here:
https://github.com/0xproflupin/seahorse-university
In case of any questions, please feel free to reach to me:
Twitter: https://twitter.com/0xAnvit
Programs
Programs are hosted and can be found here:
Syllabus
Chapter 1: On-Hands Introduction to Seahorse Lang: Poll App
The main focus of this Chapter will be to dive straight into the writing a Seahorse program without getting into the nitty-gritties of installing CLIs and dependancies. We will be using Solana Playground to write, test and publish our Seahorse Program. We will also write Anchor tests for our program and finally write a frontend in ReactJS.
We will focus on learning the very basics of Solana Core Programming.
Chapter 2: On-Hands Introduction to Seahorse Lang: Counter App
In this chapter we will learn how to build a Counter App, and use Program Derived Addresses (PDAs) to do so. The program is similar to the above, but the use of PDAs opens up a new paradigm to the learners which is crucial for Solana Programming.
[Coming Soon] Chapter 3: On-Hands Introduction to Seahorse Lang: Escrow App
Chapter 4 [optional]: Introduction to Solana Core
This chapter contains a glossary of important topics/words that readers should ideally know before proceeding to chapter 1.
- Primer on Blockchain and Solana
- Intro to blockchain
- Blocks
- Leader
- Validators
- Proof of History (PoH) VDF
- Account Model
- Intro to Accounts
- Mutable / Immutable
- Transaction parallelisation
- Program Derived Addresses (PDAs)
- Instructions and Transactions
- Instructions
- Anatomy of intructions
- Transactions
- Anatomy of transactions
- Vote vs Non-vote transactions
- Versioned transactions
- Lookup Tables
- Programs
- Introduction to programs
- State
- Data
- Native
- SPL
- Solana Program Library (SPL)
- Token Program
- spl-token-cli
- Associated Token Account Program
- Mint Account
- Token Metadata Program
- Fungible Tokens
- Fungible assets
- Non-Fungible tokens (NFTs)
Goal
What we want to achieve with this course
Python is one of the most highly used languages worldwide for intro to programming courses. Due to the high popularity of Data Science and AI in recent years, there has been a significant increase in the number of Python developers. Web 3.0 is still inaccessible to these developers due to systems languages like Rust, and C is more famous for coding contracts on-chain.
The goal of this course should be to make Solana development accessible to relatively inexperienced developers and strictly act as a starting point to gauge interest and explore this new world of blockchain and decentralization.
The ultimate goal would be to see Solana projects being part of Intro to Programming courses at universities worldwide. This course could act as a starting point to build decentralized full-stack dapps on Solana.
Our First Solana App
In this section we'll build our first Solana program using Seahorse. If you've gone through the optional chapter Introduction to Solana Core, you probably already know the very basics of the Solana account model. But if not, that is completely fine as we'll go through those concepts as we build our program.
Here are some of the concepts we'll touch upon:
- Accounts
- Instructions
- Programs
- Transactions
- Testing using Anchor
A point to note for this page: we'll go though the entire process of making a full stack Solana app in great detail. You might already be aware of how to build react frontends but we'll go through the process nevertheless to make sure new Solana programmers are cognizant of how the chain interacts with the frontend and how can one bootstrap a Solana dapp easily.
Before we dive into writing the program, lets understand what we are trying to build.
The Blockchain Poll App
The idea is to make a poll which lets users choose their favorite Blockchain (we know Solana is the best but whatever). The app should show the current status of the poll, ie, the votes given to each chain and also let the users vote.
Solana Playground
Solana Playground is browser based application that will let you write, build, and deploy on chain Solana programs, all from your browser. This is very useful if we don't want to deal with a million dependancies and quickly want to bootsrap our Seahorse programs. It even has an inbuilt burner wallet so you won't have to worry about connecting external wallets or approving transactions.
For our first Seahorse program, we'll use Solana Playground to quickly get up and running without worrying about installing CLI tools or dependancies. Let's get started!
Getting Started with SolPG
- Go to Solana Playground and make a new Seahorse Project, and name it Poll.
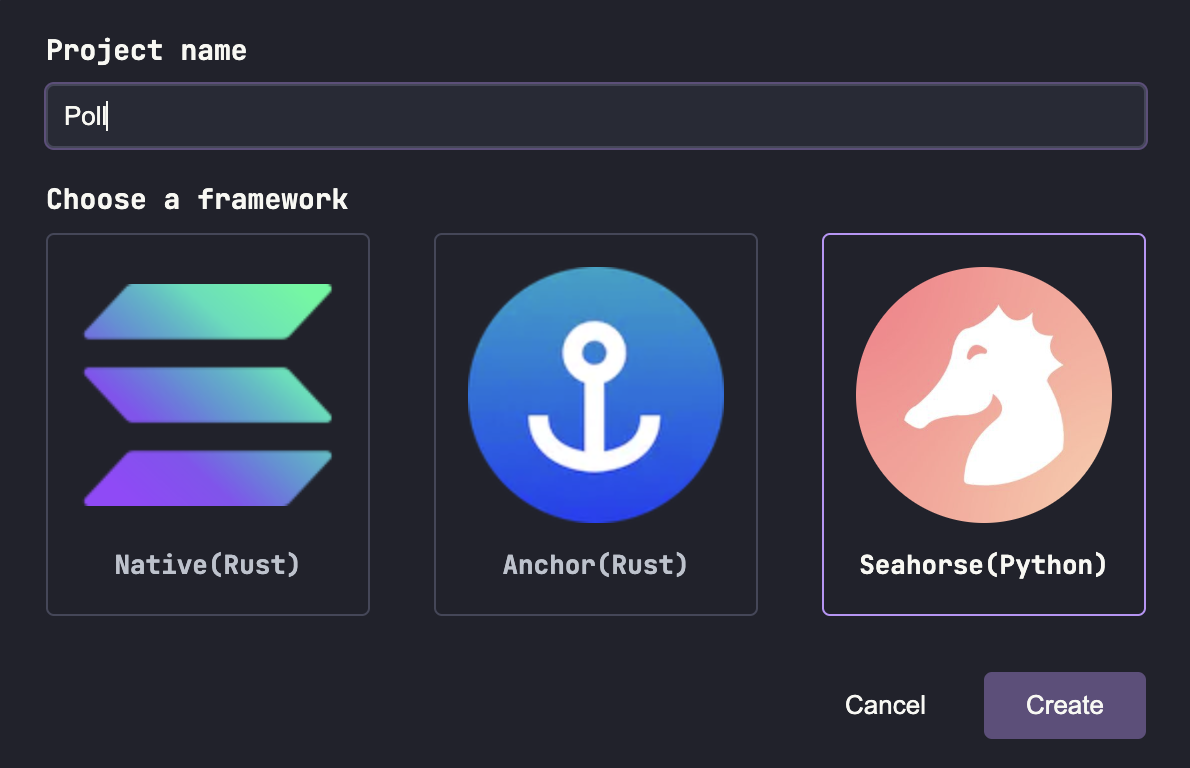
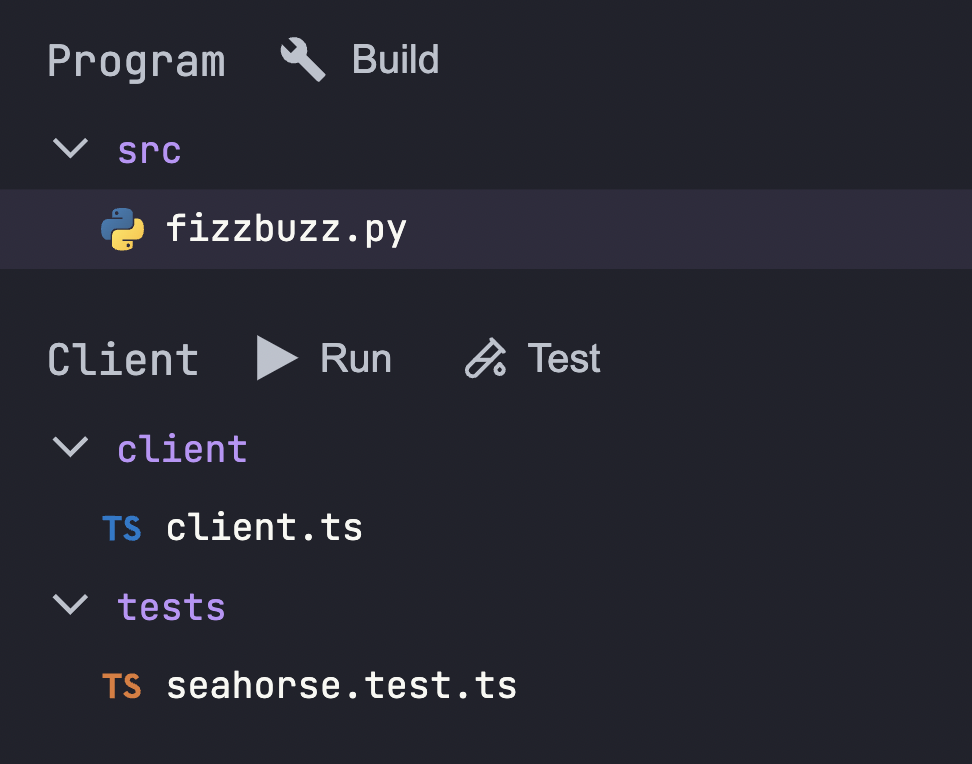
- This will create a Seahorse project for you and you won't have to worry about any dependancies. SolPg creates the Seahorse project with the following structure:
Poll
|\_ src
    |\_ fizzbuzz.py
|\_ client
    |\_ client.ts
|\_ tests
    |\_ seahorse.test.py
-
src/fizzbuzz.pycurrently contains a boilerplate starter program written in Seahorse Lang. We can already see the structure that a Seahorse program follows, but we'll come to that later. -
client/client.tscan host Javascript code that can be used to simulate actual frontend user experience of your app. In this file, we can add code to simulate the interaction of our frontend with our program. -
tests/seahorse.test.tswill contain our Anchor Unit Tests written in Javascript. This goes a level deeper thanclient.tsand is essential to check if our Program is functional and working as expected or not. -
There are three more tabs: Build & Deploy, Test and Tutorials. We'll come back to them while testing and deploying our program
-
For now, rename
fizzbuzz.pytopoll.py -
In the terminal at the bottom of the screen, airdrop 4-5 SOL to the burner wallet on devnet:
solana airdrop 2
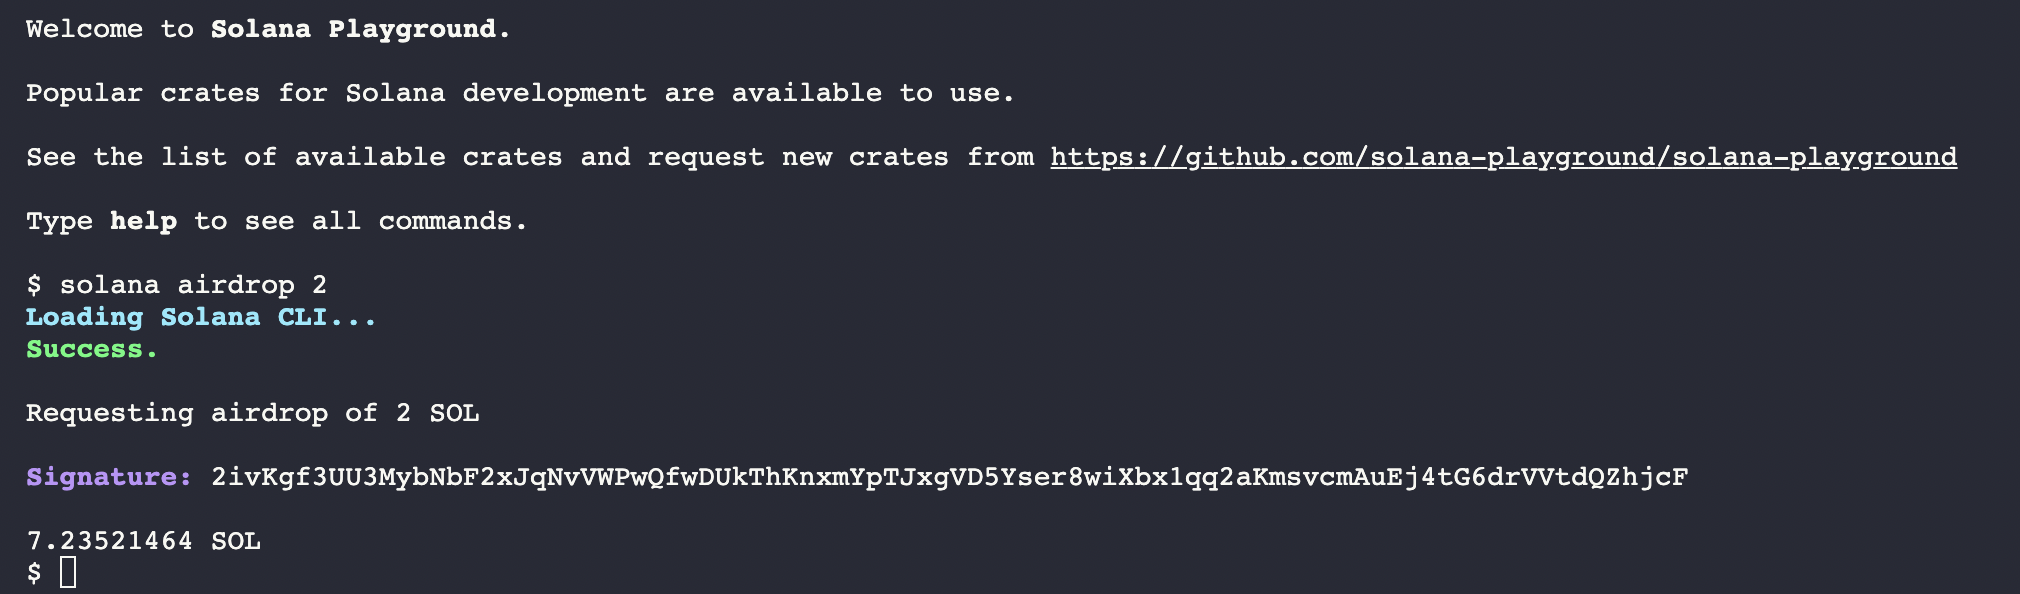
Don't airdrop more than 2 SOL at once due to RPC limits on devnet airdrops
- We will airdrop more SOL to our wallet when we are deploying our program. But for now, the balance will be visible at the bottom of the screen.

We are now ready to edit poll.py and write our first Seahorse program!
Add Accounts
As mentioned in the accounts section, decentralised apps need to track the current state: number of tokens, NFTs transferred, current highest bidder in an auction, orders for a token on a dex etc. These states need to be saved in data storing units on-chain, called
accounts.
As you'd have imagined already, we will have to store the state, ie, the number of votes for each candidate of the poll at a given time somewhere. To store this state, we will create and use an account. Accounts are data storing units in Solana. We will explore them more throughout this course.
Open poll.py and you will see this:
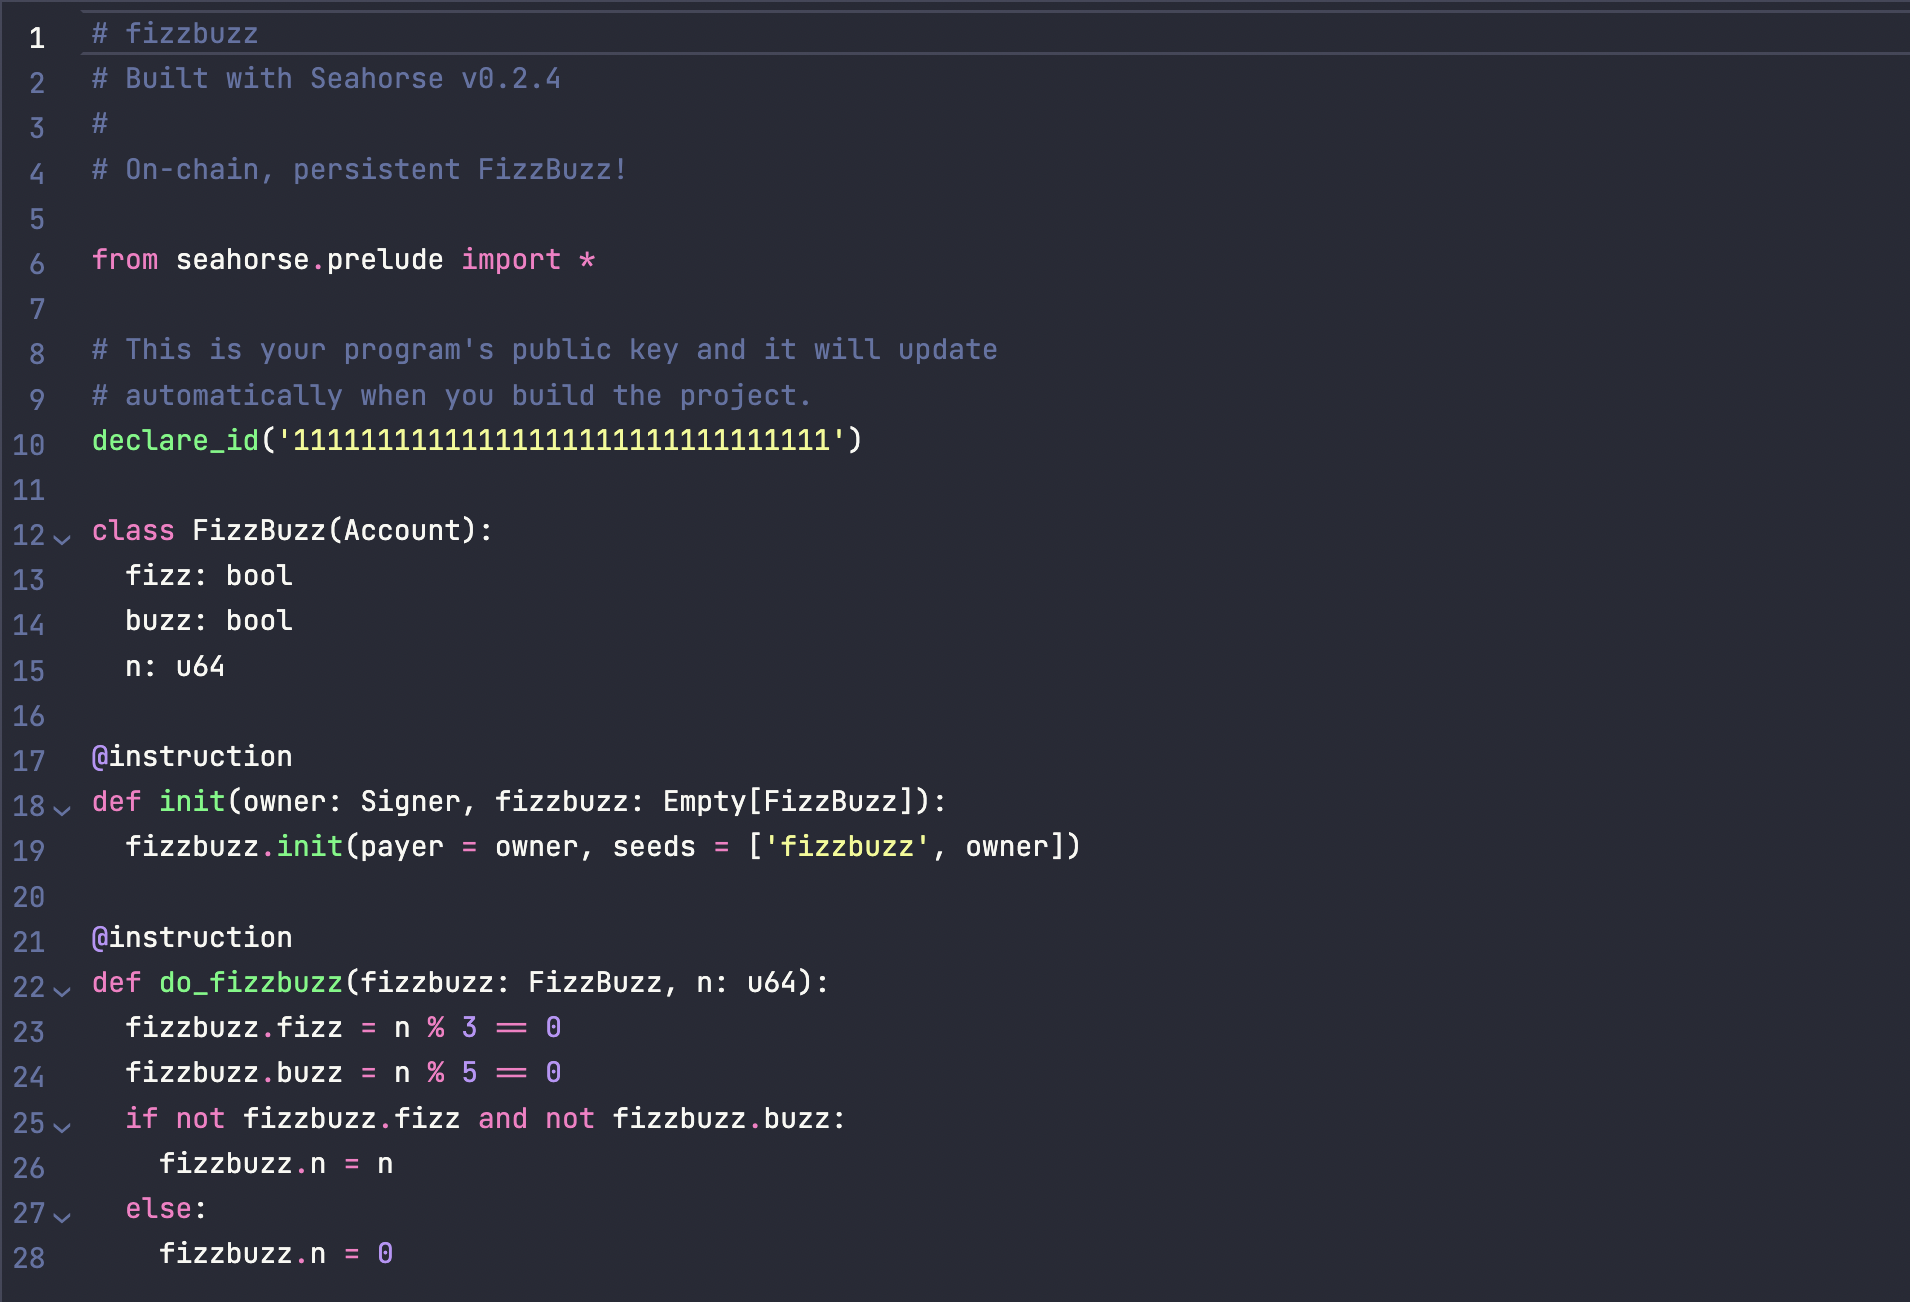
- Firstly, replace all instaces of "FizzBuzz" from the file and replace it with "Poll"
- Also remove everything after line 11. Your
poll.pyshould look like this:
# Poll
# Built with Seahorse v0.2.4
#
# On-chain, persistent Poll!

from seahorse.prelude import *

# This is your program's public key and it will update
# automatically when you build the project.
declare_id('11111111111111111111111111111111')
We will discuss what declare_id does when we discuss Programs. But essentially, the program address is declared within the declare_id. More on it in the next program.
In Seahorse, accounts are represented by classes derived from the Account base class.
Let's add a Poll account to the poll.py file which will represent the poll state.
class Poll(Account):
  ethereum: u64
  solana: u64
  polygon: u64
- The individual fields of the class represent the data which will be stored in the account.
- In our case these fields are
ethereum,solanaandpolygonthat represent the number of votes given to these chains respectively. - We use the unsigned
u64data type to store votes as votes can never be negative.
Using the
uXnotation is not usual to Python. In Python, integers are by default unsigned of default datatypeu32for 32 bit systems, andu64for 64 bit systems. In case of Seahorse, its necessary to define their underlying data type by using type-annotated fields with no default value.u64for example corresponds to an unsigned integer with 64 bits.
poll.py will look like this:
from seahorse.prelude import *

declare_id('11111111111111111111111111111111')

class Poll(Account):
  ethereum: u64
  solana: u64
  polygon: u64
Now that we know that accounts will be used to store the poll state on-chain, how can one interact with them to write or modify data?
Instructions!
Add Instructions
As mentioned in the instructions and transactions section, Instructions are the basic operational units on Solana. Instructions are commands that can be bundled up together to form Transactions. These transactions can then be executed by a Program to read and/or write data from one or more Accounts. The instructions that form the transaction are executed atomically, or one-by-one in the order in which they were added to form the transaction.
To make instances of polls, and write/modify the data stored in these polls, we will need to write instructions for our program.
Initialising Poll
Instructions in Seahorse are written using functions with the @instruction decorator. Let's add a create_poll instruction to our program:
from seahorse.prelude import *

declare_id('11111111111111111111111111111111')

class Poll(Account):
  ethereum: u64
  solana: u64
  polygon: u64

# Initialises the poll account
@instruction
def create(poll: Empty[Poll], user: Signer):
    poll = poll.init(
        payer=user
    )
From the first look, this may seem a little weird if you've never seen a statically typed language before like TypeScript.
def create_poll(poll: Empty[Poll], user: Signer)
-
In Python, it is not necessary to declare the type of variables, but in Seahorse its necessary to do so to determine at compile time what account type does the variable belong to.
-
There are a new account type mentioned here:
Empty. This is a Seahorse native account type. -
Empty[Poll]indicates thatpollis an empty account of typepoll. This means thatpollhas not yet been initialised and has no data stored.
poll = poll.init(
  payer=user
)
In the above codeblock, we are using .init() on the Empty poll account. We use the payer argument to choose the user account to pay for the instruction. For the .init() instruction the signer is required to pay to initialise the account. Solana transactions involve a cost, and the payer account needs to be assigned for the individual instruction which will be debited some SOL when the transaction is processed.
We get back the initialised poll account from .init() which we will use later to modify poll state.
Voting
As of now, we have added an instruction to our program to initialise a poll account. Now its time to add an instruction to let users vote for their favorite blockchain.
Let's add the following code to the poll.py file:
@instruction
def vote(user: Signer, poll: Poll, vote_op: str):
  if vote_op == "eth":
    poll.ethereum += 1
  elif vote_op == "sol":
    poll.solana += 1
  elif vote_op == "pol":
    poll.polygon += 1
  else:
    print("Candidate does not exist")
We add the following as instruction parameters:
useraccount of typeSignerpollaccount of typePollvote_openum of typestr
For the already-trained in Anchor, the above might look strange as we are essentially adding accounts and other data as instruction parameters together. This is way simpler than Anchor where data and accounts have to be handled differently.
-
Like
Empty,Signeris also an in-built account type available in Seahorse. In any blockchain, users need to sign the transactions to modify state of accounts (write/modify data). In our case as well, for a user to vote for their favorite chain and hence change the state of the account, they will have to sign a transaction.Signerrepresents the type of accountuserwhich will sign the transaction which will contain given intruction (create_poll). -
The rest of the instruction is pretty straight-forward as we are simply incrementing the dedicated chain fields in the
pollaccount depending on the type ofvote_opprovided. -
As
pollis essentially a Python object, the individual fields:ethereum,solanaandpolygoncan be fetched simply by.notation:poll.solana. -
print(): Seahorse print statements are pretty much the same as Python print statements, and you can use them to print debug your programs. Under the hood, they get translated to an equivalant call to the Solana logger.
Voila, we are done with our first Solana Program thanks to Seahorse! Our program looks like this:
# poll
# Built with Seahorse v0.2.4
#
# On-chain, persistent Poll!

from seahorse.prelude import *

declare_id('11111111111111111111111111111111')

class Poll(Account):
    ethereum: u64
    solana: u64
    polygon: u64

@instruction
def create(poll: Empty[Poll], user: Signer):
    poll = poll.init(
        payer=user
    )

@instruction
def vote(user: Signer, poll: Poll, vote_op: str):
    if vote_op == "eth":
        poll.ethereum += 1
    elif vote_op == "sol":
        poll.solana += 1
    elif vote_op == "pol":
        poll.polygon += 1
Build and Deploy
Building our Program
Now that we have written our program, we need to convert the Seahorse program, written in Python and convert it into an Anchor program written in Rust. We won't go into the inner mechanisms of how this happens, but if you want to delve deep into it, read up the Seahorse Compiler Overview.
-
On Solana Playground, press Cmd + Shift + B, or press the Build and Deploy icon on the sidebar.
-
This will open up this in the sidebar:
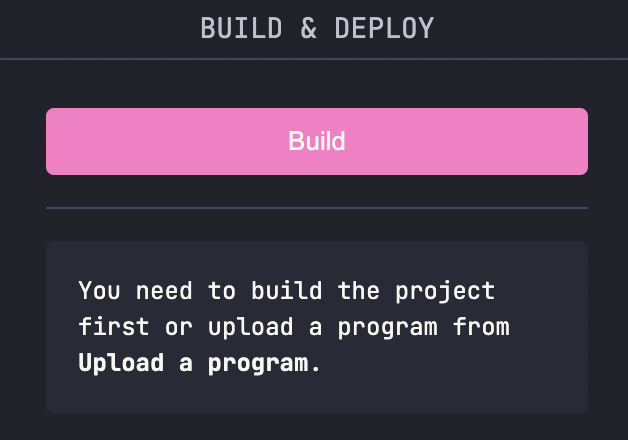
- Press on the build button and wait for a few seconds. If everything goes well, you should see something like this:

Deploying our Program
- Once built successfully, we will now Deploy our program, or in other words, publish our program on-chain. This however costs some Solana. We will airdrop some more on our dev wallet. On the CLI:
solana airdrop 2
- Now we can press the Deploy button on the sidebar to deploy our program. We will see that some SOL will get deducted from our dev wallet. It should take a few seconds, but once done you should see something like this:

Congrats! Your first Solana Program is deployed on-chain.
Initialise and Export IDL
The final step is to initialise and Export our IDL.
-
We initialise the IDL to make the struct of our Poll account publicly available.
-
Pressing on IDL and then choosing the
Initialisebutton would make an IDL account on-chain, like this:

This helps indexers in parsing data and other applications showing our Poll States in nice UIs. This is another contributing factor to Solana's "composability", which means that applications can be built upon each other and interact with each other with ease!
- For example, visit: https://solscan.io/account/5MgjVvaSLj6zmxuYhSST1M4LBiXoiSMrJPDZTRPQoiw8?cluster=devnet#anchorProgramIDL Here we can see the different Instructions and Accounts are programs owns.
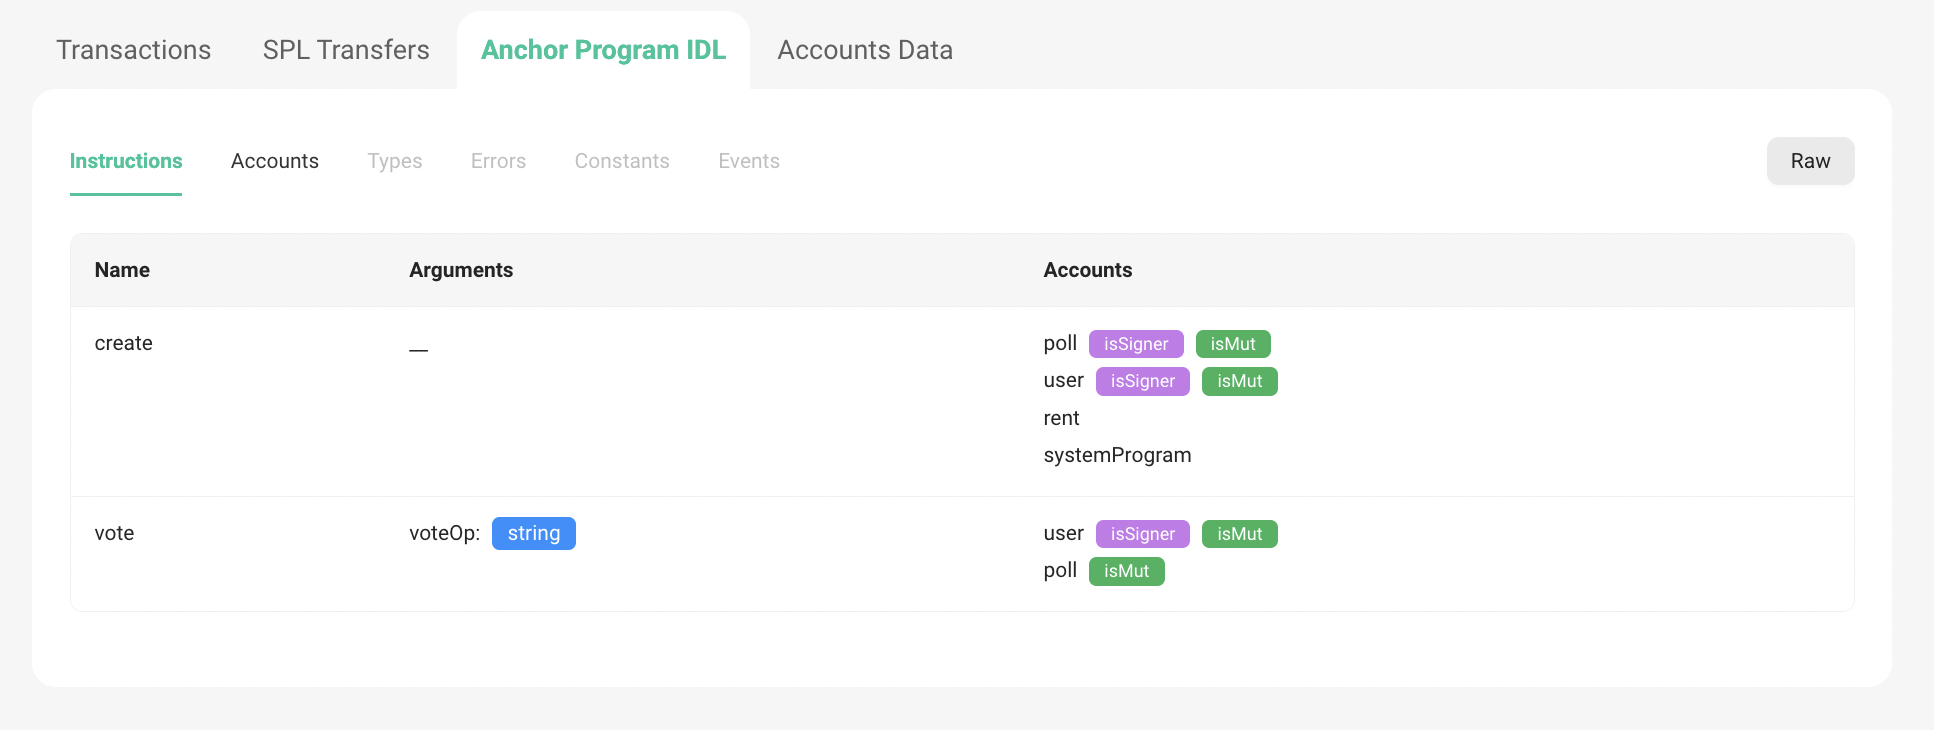
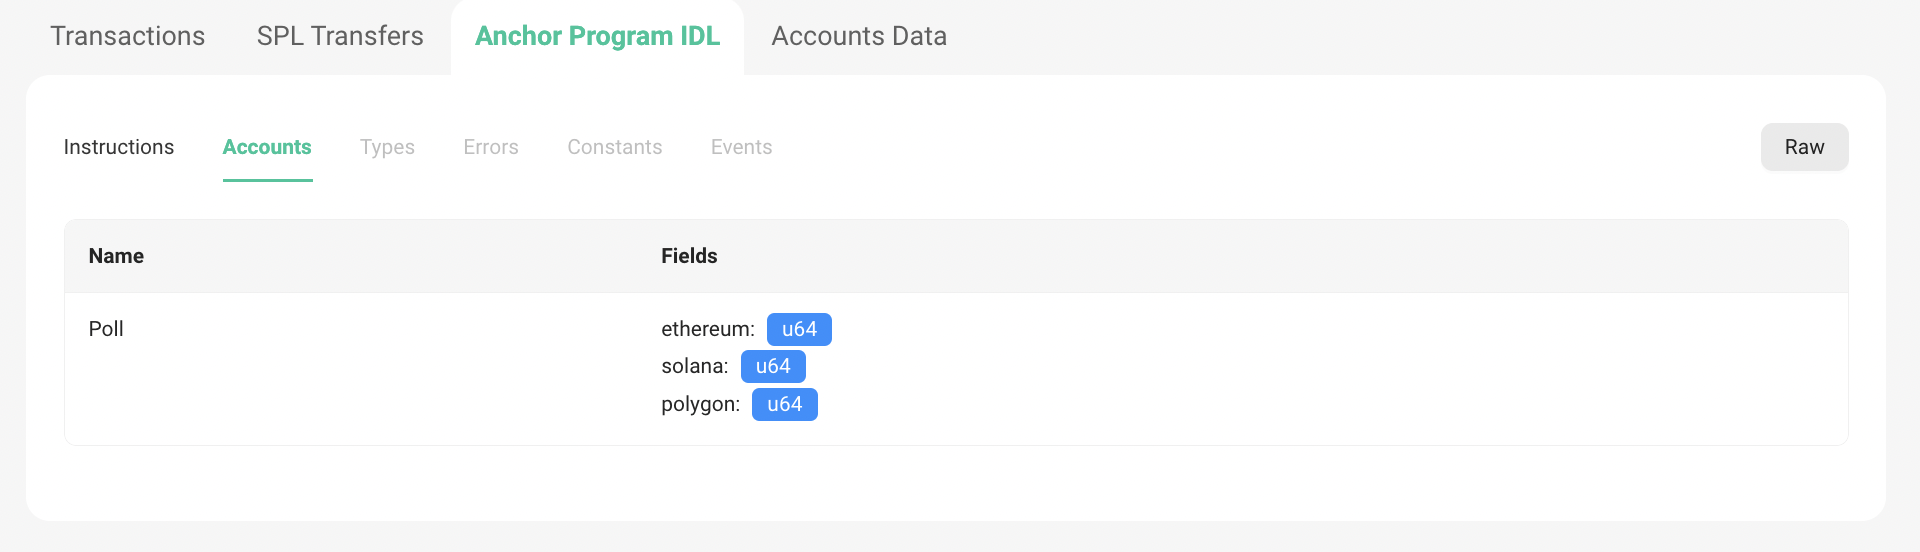
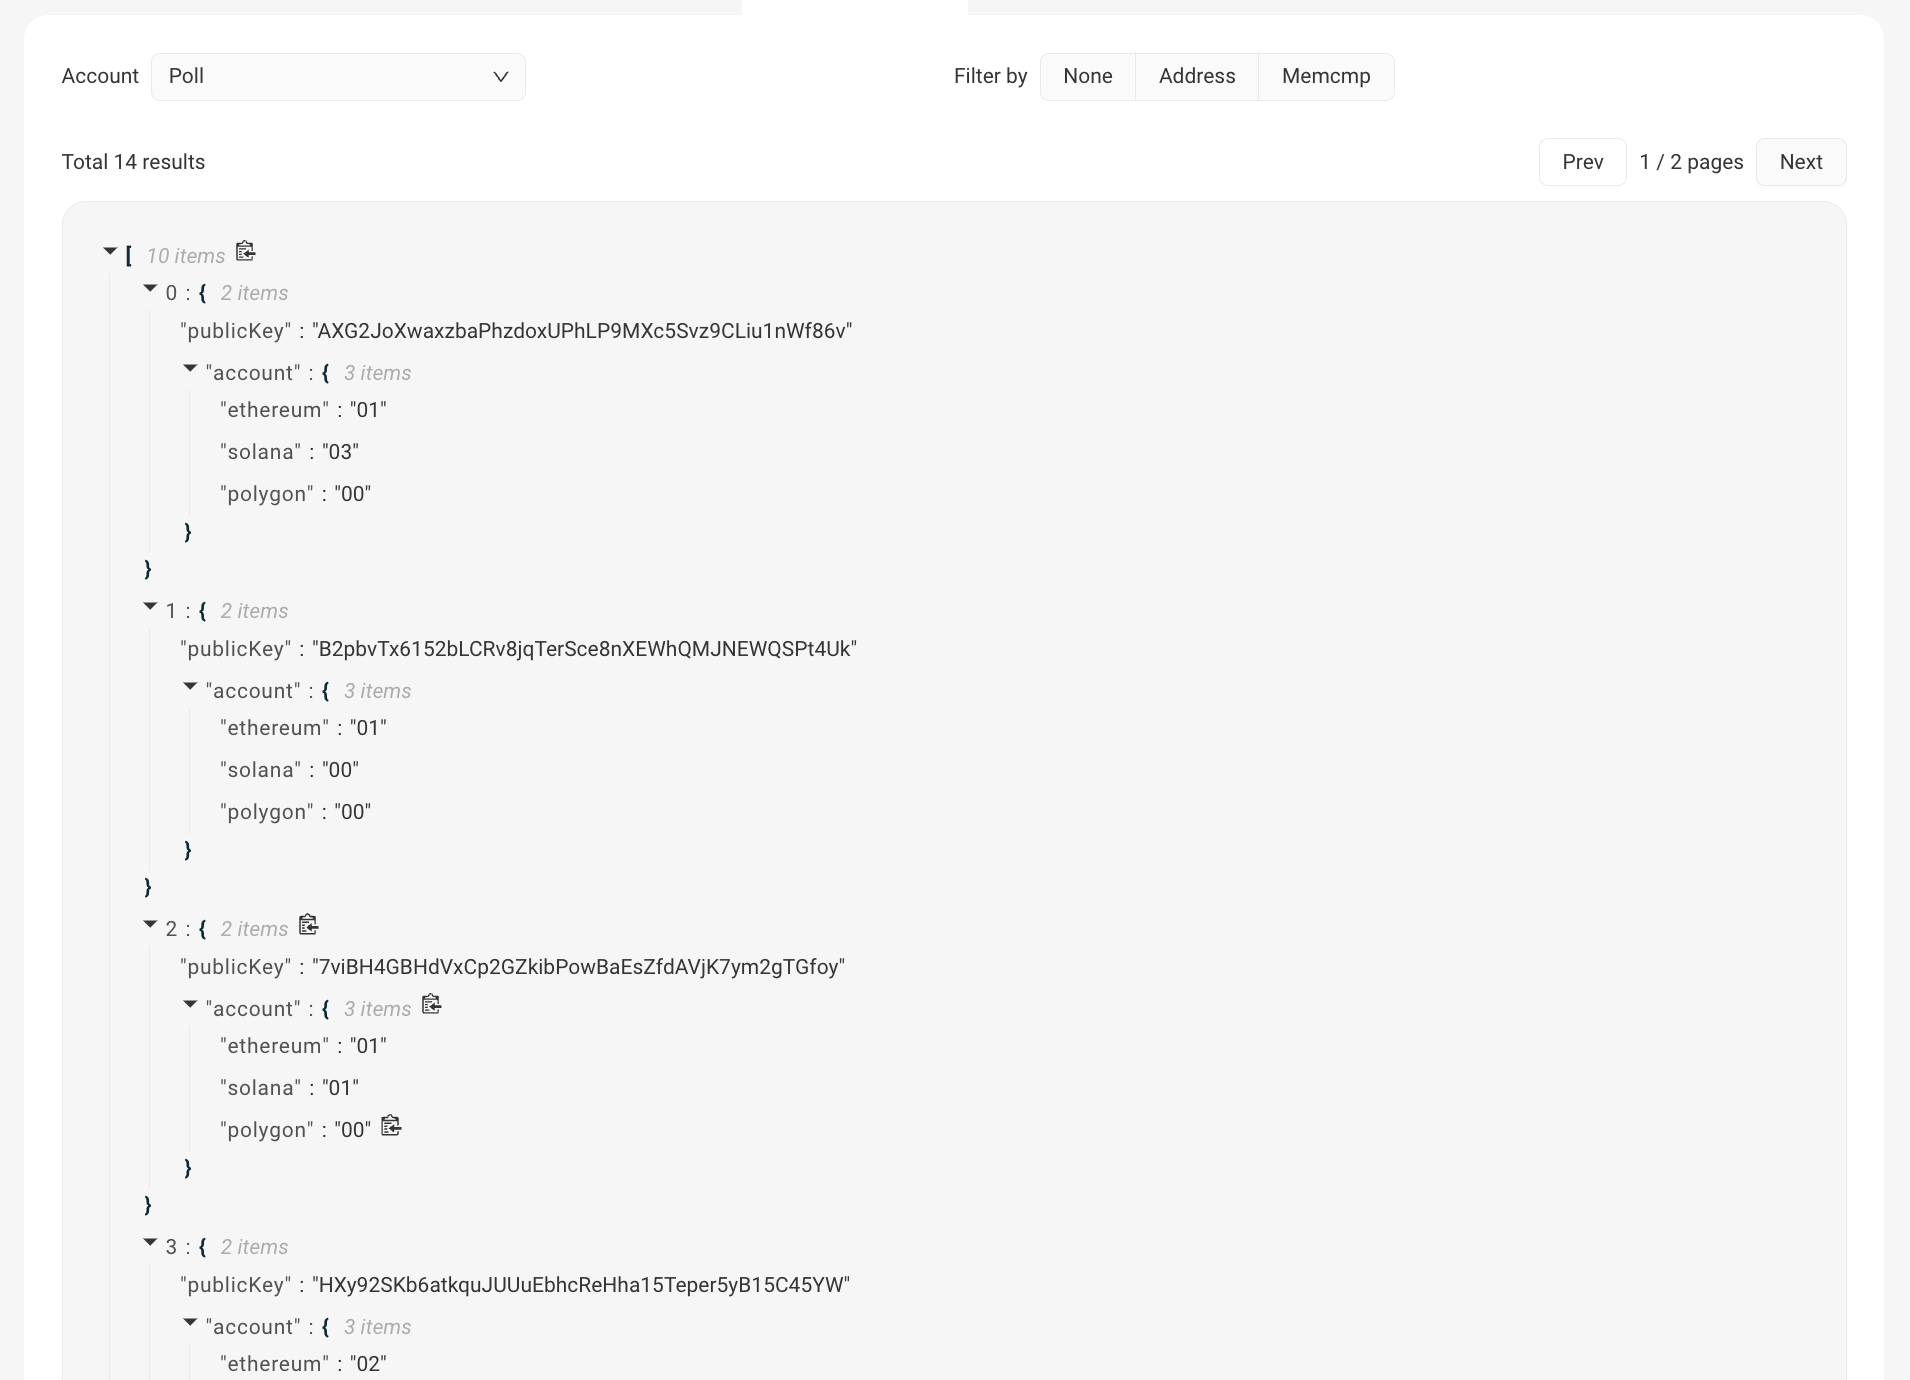
- We can also go to the
Accounts Datatab and selectPollaccount in theAccountdrop down menu to see our various Poll Accounts and their states, that have been made by different users already trying this program. Pretty neat :)
- Finally, we should export the IDL, which will be used while making our frontend. You can do so by pressing the
Exportbutton in the IDL section. This will download the IDL as aidl.jsonJSON file.
Testing
Although we've written the program, we have no clue if the logic works as expected.
Luckily Solana Playground provides an awesome User Interface to play around with our program and check its working or not. Let's head to the Test tab by selecting it in the sidemenu, or pressing Cmd + Shift + D.
Testing with SolPg UI
Solana Playground provides a UI to trigger instructions and fetch program accounts. Once we are in the Test tab, we can see our 2 instructions in the sidebar
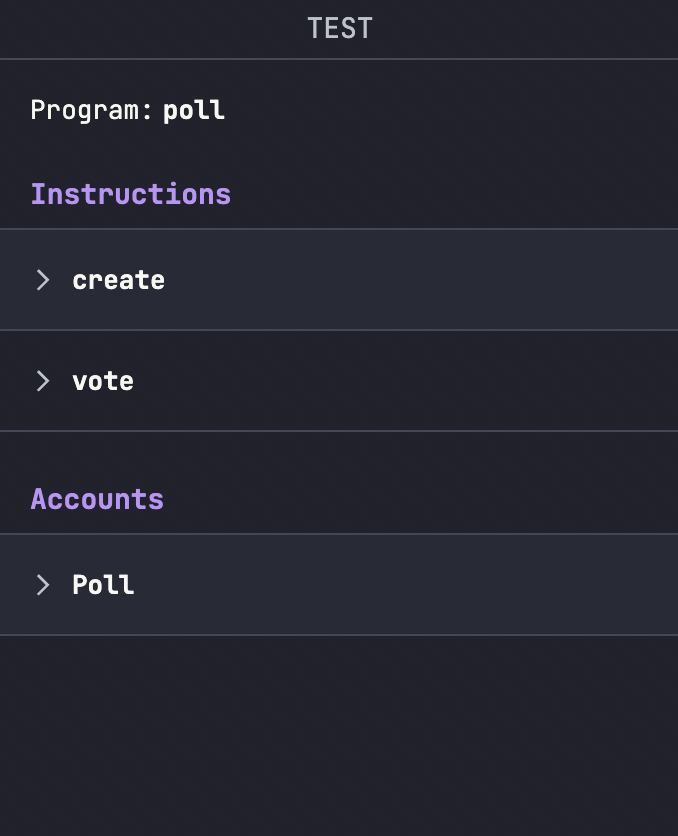
Create Instruction
First up we'll test our create instruction which creates a new Poll
- Press on the
createbutton underInstructions - Choose
Randominpolldropdown. This is because thepolladdress is a random publicKey. Copy this address and paste it for later use. - Choose
My addressinuserdropdown - Press Test
- You should see on the terminal:
Test 'create' passed.
Vote Instruction
- Press on the
votebutton underInstructions - Type
solin thevoteOpto vote for Solana - Choose
My addressinuserdropdown - Paste the address that we copied earlier which points to our poll account under
poll - Press Test
- You should see on the terminal:
Test 'vote' passed.
We can also fetch all of the created Polls for our program by pressing the Fetch All button under the Accounts section. It will result in something like this:
This shows the current state of all the Poll accounts active under our program!
Testing with Anchor
We can test our program using the Anchor framework more systematically. Don't worry, you won't require any Anchor expertise here, just some basic Javascript knowledge will do!
Testing with SolPg UI
Solana Playground provides a UI to trigger instructions and fetch program accounts. Once we are in the Test tab, we can see our 2 instructions in the sidebar
Create Instruction
First up we'll test our create instruction which creates a new Poll
- Press on the
createbutton underInstructions - Choose
Randominpolldropdown. This is because thepolladdress is a random publicKey. Copy this address and paste it for later use. - Choose
My addressinuserdropdown - Press Test
- You should see on the terminal:
Test 'create' passed.
Vote Instruction
- Press on the
votebutton underInstructions - Type
solin thevoteOpto vote for Solana - Choose
My addressinuserdropdown - Paste the address that we copied earlier which points to our poll account under
poll - Press Test
- You should see on the terminal:
Test 'vote' passed.
Fetch Accounts
We can also fetch all of the created Polls for our program by pressing the Fetch All button under the Accounts section. It will result in something like this:
This shows the current state of all the Poll accounts active under our program and also includes the address of the Poll we just created.
Instead of fetching all accounts, we can fetch the state of our Poll account (the address we copied earlier) by pasting the Poll address. As we have voted once for Solana, the state looks like this:
{
    "publicKey": "FSPifWjvNukNJHqvQRw8zNRmukwmtVPzxtgCujveYb6r",
    "account": {
        "ethereum": "0",
        "solana": "1",
        "polygon": "0"
    }
}
This shows that our poll creation and voting instructions have passed with flying colors!
Testing With Anchor
Making a Test Suite
The test will be written in Typescipt (a superset of Javascript). Don't worry if you've not interacted with the langauge before. We will go through each step of writing tests in great detail.
We'll start by removing all the code from the tests/seahorse.test.ts file, and replacing it with:
describe("Test Poll Program", async () => {
    // All tests will go in here

    //
}
This adds a describe function and supply a string value describing the test suite. Additionally, it’s a good idea to add individual describe methods for each test or set of test cases within the group. While it’s not mandatory, grouping related logic is quite useful and makes tests easier to maintain.
Generate Account Keypair
Inside this function, add:
    // Generate the poll account
    const newPoll = web3.Keypair.generate();
This uses solana-web3.js library to generate a new keypair. We will use to initialise our Poll state account which we talked about in the adding accounts section.
Next up, we'll write some unit tests in our test suite.
Unit Test for Poll Creation
We will now add our first unit test for testing the create instruction. Add this within the describe function:
    it("test createPoll instruction", async () => {
        // Send transaction
        const txHash = await pg.program.methods
            // instuction name
            .create()
            // add all accounts used by the instruction
            .accounts({
                poll: newPoll.publicKey,
                user: pg.wallet.publicKey,
            })
            // add all signer ketpairs
            .signers([newPoll])
            // call .rpc() to sign and send the transaction
            .rpc();
        console.log(`Use 'solana confirm -v ${txHash}' to see the logs`);

        // Confirm transaction
        await pg.connection.confirmTransaction(txHash);

        // Fetch the initialised poll account
        const pollAccount = await pg.program.account.poll.fetch(newPoll.publicKey);

        assert(pollAccount.solana.toString(), "0");
        assert(pollAccount.ethereum.toString(), "0");
        assert(pollAccount.polygon.toString(), "0");
    });
The first part of this unittest is to interact with our program:
const txHash = await pg.program.methods
    // instuction name
    .create()
    // add all accounts used by the instruction
    .accounts({
        poll: newPoll.publicKey,
        user: pg.wallet.publicKey,
    })
    // add all signer ketpairs
    .signers([newPoll])
    // call .rpc() to sign and send the transaction
    .rpc();
- Here we are using the preloaded program (thanks to SolPG) and using the
.methodsto access all instructions we had defined in the program earlier. - The
createinstruction is accessed in camelCase:.create(). - We then specify all accounts that the
createinstruction uses using.accounts(). This includespoll: which is the public key of our newly generated poll account keypair, anduser: which is the wallet being used to sign the transaction (and in our case it is the SolPG burner wallet access bypg.wallet). - We will now include all signers of the instruction using
signers(). Anchor tests by default already includes the user's wallet as a signer so we don't explicitly have to mention it. We will however include thenewPollkeypair we generated earlier to instantiate the poll account. - Finally we call the
.rpc()method to sign and send the transaction. If we were using an extension wallet like Phantom, we would have seen a popup to sign the transaction.
The next part of the unittest is to fetch the instantiated account and do some assertions:
// Confirm transaction
await pg.connection.confirmTransaction(txHash);

// Fetch the initialised poll account
const pollAccount = await pg.program.account.poll.fetch(newPoll.publicKey);

assert(pollAccount.solana.toString(), "0");
assert(pollAccount.ethereum.toString(), "0");
assert(pollAccount.polygon.toString(), "0");
- We are first using
connection.confirmTransactionto ensure that the transaction has been confirmed. - The next step is to fetch the instantiated poll account. Here you might notice that we are able to do something like
program.account.poll. This is because of the IDL that got generated while deploying are program. It allows anchor to access the structure of the program and its accounts & instructions. We then use.fetch()to fetch the account by mentioning the actual public key of the account which isnewPoll.publicKey. - Once the poll account is fetched using Anchor, we can access its different data fields that the account owns:
solana,ethereumandpolygonwhich represent the number of votes the 3 chains have got respectively. We will however need to convert it into a string as Anchor by default converts integers to BigNum or BN. - We finally do the assertions to check if the values are currently 0.
Our unittest file currently looks like this:
// No imports needed: web3, anchor, pg and more are globally available

describe("Test Poll Program", async () => {
  // Generate the poll account
  const newPoll = web3.Keypair.generate();

  it("createPoll", async () => {
    // Send transaction
    const txHash = await pg.program.methods
      .create()
      .accounts({
        poll: newPoll.publicKey,
        user: pg.wallet.publicKey,
      })
      .signers([newPoll])
      .rpc();
    console.log(`Use 'solana confirm -v ${txHash}' to see the logs`);

    // Confirm transaction
    await pg.connection.confirmTransaction(txHash);

    // Fetch the created account
    const pollAccount = await pg.program.account.poll.fetch(newPoll.publicKey);

    assert(pollAccount.solana.toString(), "0");
    assert(pollAccount.ethereum.toString(), "0");
    assert(pollAccount.polygon.toString(), "0");
  });
}
# Unit Test for Voting
We will now add the unit testing for the vote intruction. Add the following code to the test suite:
it("vote", async () => {
    // Send transaction
    const txSolHash = await pg.program.methods
      .vote({ sol: true })
      .accounts({
        poll: newPoll.publicKey,
        user: pg.wallet.publicKey,
      })
      .rpc();

    // Confirm transaction
    await pg.connection.confirmTransaction(txSolHash);

    // Send transaction
    const txEthHash = await pg.program.methods
      .vote({ eth: true })
      .accounts({
        poll: newPoll.publicKey,
        user: pg.wallet.publicKey,
      })
      .rpc();

    // Confirm transaction
    await pg.connection.confirmTransaction(txEthHash);

    // Fetch the poll account
    const pollAccount = await pg.program.account.poll.fetch(newPoll.publicKey);

    console.log("ethereum:", pollAccount.ethereum.toString());
    assert(pollAccount.ethereum.toString(), "1");

    console.log("solana:", pollAccount.solana.toString());
    assert(pollAccount.solana.toString(), "1");

    console.log("polygon:", pollAccount.polygon.toString());
    assert(pollAccount.polygon.toString(), "0");
});
Let's got through this step by step.
const txSolHash = await pg.program.methods
    .vote({ sol: true })
    .accounts({
        poll: newPoll.publicKey,
        user: pg.wallet.publicKey,
    })
    .rpc();
- Here we are using
.methodsto access the instructions like before .vote()is used with a{sol: true}object as a parameter.solcomes from theVoteOperationenum we defined in our program.- We don't mention
signerslike in the case of creating a poll because thenewPollkeypair was needed to initialise the account.
This comprises of a vote for Solana. We do the same below that for Ethereum. After voting:
// Confirm transaction
await pg.connection.confirmTransaction(txEthHash);

// Fetch the poll account
const pollAccount = await pg.program.account.poll.fetch(newPoll.publicKey);

console.log("ethereum:", pollAccount.ethereum.toString());
assert(pollAccount.ethereum.toString(), "1");

console.log("solana:", pollAccount.solana.toString());
assert(pollAccount.solana.toString(), "1");

console.log("polygon:", pollAccount.polygon.toString());
assert(pollAccount.polygon.toString(), "0");
- We first confirm the transaction which was signed and sent using
.rpc()earlier. - We fetch the
pollaccount using thenewPollpubkey - Once the
pollaccount is fetched, we can access its data:.solana,.ethereumand.polygon. We however need to convert it to a string as its in theBNdata type. - As we have voted once each for Solana and Ethereum, we do the assertions accordingly.
Our final unittest file looks like this:
// No imports needed: web3, anchor, pg and more are globally available

describe("Test Poll Program", async () => {
  // Generate the poll account
  const newPoll = web3.Keypair.generate();

  it("createPoll", async () => {
    // Send transaction
    const txHash = await pg.program.methods
      .create()
      .accounts({
        poll: newPoll.publicKey,
        user: pg.wallet.publicKey,
      })
      .signers([newPoll])
      .rpc();
    console.log(`Use 'solana confirm -v ${txHash}' to see the logs`);

    // Confirm transaction
    await pg.connection.confirmTransaction(txHash);

    // Fetch the created account
    const pollAccount = await pg.program.account.poll.fetch(newPoll.publicKey);

    assert(pollAccount.solana.toString(), "0");
    assert(pollAccount.ethereum.toString(), "0");
    assert(pollAccount.polygon.toString(), "0");
  });

  it("vote", async () => {
    // Send transaction
    const txSolHash = await pg.program.methods
      .vote("sol")
      .accounts({
        poll: newPoll.publicKey,
        user: pg.wallet.publicKey,
      })
      .rpc();

    // Confirm transaction
    await pg.connection.confirmTransaction(txSolHash);

    // Send transaction
    const txEthHash = await pg.program.methods
      .vote("eth")
      .accounts({
        poll: newPoll.publicKey,
        user: pg.wallet.publicKey,
      })
      .rpc();

    // Confirm transaction
    await pg.connection.confirmTransaction(txEthHash);

    // Fetch the poll account
    const pollAccount = await pg.program.account.poll.fetch(newPoll.publicKey);

    console.log("ethereum:", pollAccount.ethereum.toString());
    assert(pollAccount.ethereum.toString(), "1");

    console.log("solana:", pollAccount.solana.toString());
    assert(pollAccount.solana.toString(), "1");

    console.log("polygon:", pollAccount.polygon.toString());
    assert(pollAccount.polygon.toString(), "0");
  });
});
Let's go ahead and figure out how to run these tests!
Running Unittests
Its time to run our awesome unit tests!
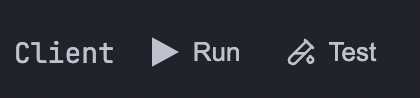
- Go back to the explorer tab by clicking on the first icon the sidemenu, or pressing Cmd+Shift+E.
- Press the Test icon under Client
- The test results if successful, should show like this on the console
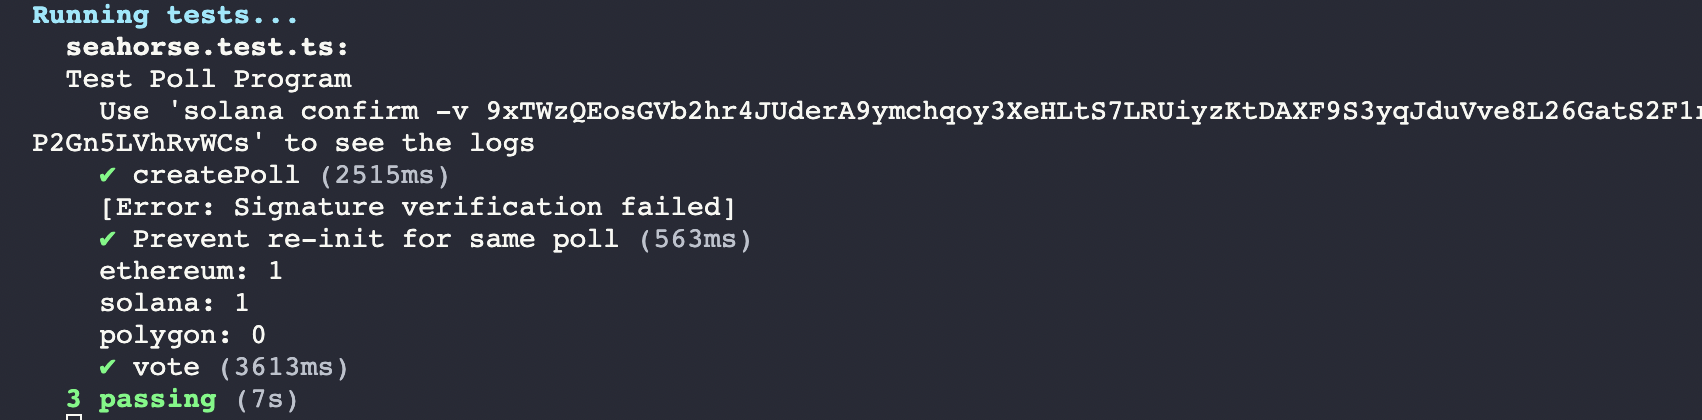
Congrats! This wraps up our first Anchor test. Not too bad, was it?
Let's go to the third and final step of creating our Poll App: the frontend!
Frontend
In this section, we will go through building a frontend for the Solana Poll Dapp using React.
Initialise React App
- Install Node.js and npm using the following guide: https://docs.npmjs.com/downloading-and-installing-node-js-and-npm
We will use CRA (Create-React-App) to quickly bootstrap our ReactJS application.
- Install Create React App
npm install -g create-react-app
- Create new react app
create-react-app poll-app
-
It should take a few seconds to complete the bootstrapping. Once done, you should see
Happy hacking!on the console. -
Enter the
poll-appand open it on a text editor like VSCode
cd poll-app
- You should see the following directory structure
|\_ node_modules
|\_ public
|\_ src
    |\_ App.js
    |\_ App.css
    |\_ index.js
    |\_ index.css
    .
    .
|\_ package-lock.json
|\_ package.json
|\_ README.md
We will be editing the src/App.js file and puting our frontend code there.
Voila, we can now get started with writing the frontend code!
Import Libraries and Set Up Constants
To import libraries in our file, we'll first need to install them. We can do so by adding them to the package.json file. Replace the contents with this:
{
  "name": "poll-app",
  "version": "0.1.0",
  "private": true,
  "dependencies": {
    "@coral-xyz/anchor": "^0.27.0",
    "@solana/wallet-adapter-base": "^0.9.18",
    "@solana/wallet-adapter-phantom": "^0.9.20",
    "@solana/wallet-adapter-react": "^0.15.21-rc.9",
    "@solana/wallet-adapter-wallets": "^0.19.11",
    "@solana/wallet-adapter-react-ui": "^0.9.23",
    "@solana/web3.js": "^1.70.1",
    "@testing-library/jest-dom": "^5.16.5",
    "@testing-library/react": "^13.4.0",
    "@testing-library/user-event": "^13.5.0",
    "react": "^18.2.0",
    "react-dom": "^18.2.0",
    "react-scripts": "5.0.1",
    "web-vitals": "^2.1.4"
  },
  "scripts": {
    "start": "react-scripts start",
    "build": "react-scripts build",
    "test": "react-scripts test",
    "eject": "react-scripts eject"
  },
  "eslintConfig": {
    "extends": [
      "react-app",
      "react-app/jest"
    ]
  },
  "browserslist": {
    "production": [
      ">0.2%",
      "not dead",
      "not op_mini all"
    ],
    "development": [
      "last 1 chrome version",
      "last 1 firefox version",
      "last 1 safari version"
    ]
  }
}
- Next, rrun the following command:
npm install
-
This will install all the libraries under
dependencies. These will be important for us to build the app and interact with the Solana chain. -
Next, we will import the necessary libraries and components for our application.
import { WalletAdapterNetwork } from "@solana/wallet-adapter-base";
import {
  ConnectionProvider,
  useWallet,
  useAnchorWallet,
  WalletProvider,
} from "@solana/wallet-adapter-react";
import {
  WalletModalProvider,
  WalletMultiButton,
} from "@solana/wallet-adapter-react-ui";
import * as anchor from "@coral-xyz/anchor";
import { useMemo, useState } from "react";
import "./App.css";
import "@solana/wallet-adapter-react-ui/styles.css";
import {
  clusterApiUrl,
  PublicKey,
} from '@solana/web3.js';
import React, { useEffect } from 'react';
- Remember we downloaded the IDL in while building and deploying the IDL? Move the IDL to this folder and import it.
import idl from "./idl.json";
-
Next, we will set up some constants related to the poll program and the Solana network. The
programIDis the public key of our program. Thenetworkis the URL for single Solana-hosted, devnet api node which is rate-limited. The opts object contains thepreflightCommitmentoption, which will determine how transactions are confirmed. -
Copy the Program ID from
src/poll.pyindeclare_id('xxx')and paste it below:
const programID = new PublicKey("5MgjVvaSLj6zmxuYhSST1M4LBiXoiSMrJPDZTRPQoiw8");
const network = "https://api.devnet.solana.com";
const opts = {
  preflightCommitment: "processed",
};
Creating Provider and Program Functions
In this section, we will create two functions to handle the connection to the program: getProvider and getProgram. Both functions accept a wallet object as input.
export const getProvider = (wallet) => {
  const connection = new anchor.web3.Connection(
    network,
    opts.preflightCommitment
  );

  const provider = new anchor.AnchorProvider(
    connection,
    wallet,
    opts.preflightCommitment
  );
  return provider;
};

export const getProgram = (wallet) => {
  const provider = getProvider(wallet);
  const program = new anchor.Program(
    idl,
    programID,
    provider
  );

  return program;
};
The getProvider function creates a new anchor.web3.Connection with the network URL and preflightCommitment option. It then creates an anchor.AnchorProvider using the connection, wallet, and preflightCommitment option, and returns it.
The getProgram function first calls getProvider to get an Anchor provider. It then creates a new anchor.Program instance with the IDL (Interface Description Language) JSON file, the program ID, and the provider. This anchor.Program instance will be used to interact with the deployed program.
Creating the Poll
In this part, we define the createPoll function that allows a user to create a new poll using the Anchor program.
const createPoll = async () => {
  if (!wallet) {
    return alert("Connect your wallet first.");
  }

  const newPoll = anchor.web3.Keypair.generate();

  await program.methods
  .create()
  .accounts({
    poll: newPoll.publicKey,
    user: wallet.publicKey,
  })
  .signers([newPoll])
  .rpc();
  const pollAccount = await program.account.poll.fetch(newPoll.publicKey);
  setVotes({
    ethereum: parseInt(pollAccount.ethereum.toString()),
    solana: parseInt(pollAccount.solana.toString()),
    polygon: parseInt(pollAccount.polygon.toString()),
  });
  setPoll(newPoll);
};
The function first checks if the wallet is connected. It then generates a new key pair for the poll and calls the create method from the program. It sets the necessary accounts and signers and sends an RPC request to the program.
After successfully creating the poll, the function fetches the newly created poll account, extracts the votes, and updates the votes and poll state variables.
Voting Functionality
We will now define the vote function that allows users to vote for their favorite Dapp.
const vote = async (candidate) => {
  if (!wallet) {
    return alert("Connect your wallet first.");
  } else if (!poll) {
    return alert("Create a new poll first.");
  }
  let vote = {};
  if (candidate === 0) {
    vote = { eth: true };
  } else if (candidate === 1) {
    vote = { sol: true };
  } else if (candidate === 2) {
    vote = { pol: true };
  }
  await program.methods
    .vote(vote)
    .accounts({
      poll: poll.publicKey,
      user: wallet.publicKey,
    })
    .rpc();

    const pollAccount = await program.account.poll.fetch(poll.publicKey);
    setVotes({
      ethereum: parseInt(pollAccount.ethereum.toString()),
      solana: parseInt(pollAccount.solana.toString()),
      polygon: parseInt(pollAccount.polygon.toString()),
    });
};
The function checks if the wallet is connected and if there is an existing poll. It then sets the vote based on the candidate and calls the vote method from the program, passing the necessary accounts. After the vote is processed, it fetches the updated poll account and updates the votes state variable.
Context and Content Components
Context Component
The Context component sets up the necessary context for the wallet and connection. This component wraps the ConnectionProvider, WalletProvider, and WalletModalProvider components to set up the wallet and connection.
const Context = ({ children }) => {
  const network = WalletAdapterNetwork.Devnet;
  const endpoint = useMemo(() => clusterApiUrl(network), [network]);

  return (
    <ConnectionProvider endpoint={endpoint}>
      <WalletProvider wallets={[]} autoConnect>
        <WalletModalProvider>{children}</WalletModalProvider>
      </WalletProvider>
    </ConnectionProvider>
  );
};
The network constant is set to WalletAdapterNetwork.Devnet. The endpoint constant uses the useMemo hook to create the Solana connection endpoint based on the network. We also create an empty array wallets using useMemo to initialize an empty wallets array.
Content Component
The Content component contains the main logic of the dapp. We first set up several useState hooks for handling the poll, votes, and wallet states.
const Content = () => {
  const { publicKey } = useWallet();
  const [poll, setPoll] = useState(null);
  const [votes, setVotes] = useState({
    solana: 0,
    ethereum: 0,
    polygon: 0,
  });
  const wallet = useAnchorWallet();
  const program = getProgram(wallet);
}
We use the useWallet hook to get the public key of the connected wallet. The useAnchorWallet hook retrieves the wallet object required for the Anchor provider and program instances. We call the getProgram function to create the program instance with the wallet.
Next, we use two useEffect hooks to fetch the poll and votes information. The first useEffect fetches the poll information and stores it in the poll state variable. The second useEffect fetches the votes for each Dapp and stores them in the votes state variable. These hooks will run whenever the wallet or poll states change.
useEffect(() => {
  const fetchPoll = async () => {
    const fetchedAccounts = await program.account.poll.all();
    setPoll(fetchedAccounts[0]);
  }
  fetchPoll();
}, []);

useEffect(() => {
  const fetchVotes = async () => {
    if (!wallet) return;
    try {
      setVotes({
        ethereum: parseInt(poll.account.ethereum.toString()),
        solana: parseInt(poll.account.solana.toString()),
        polygon: parseInt(poll.account.polygon.toString()),
      });
      console.log("Poll fetched.");
      console.log(``);
    } catch (e) {
      setVotes({
        ethereum: 0,
        solana: 0,
        polygon: 0,
      });
      console.log("Poll is not initialised!");
    }
  }
  fetchVotes();
}, [wallet, poll]);
Rendering the UI
The final part of the Content component renders the UI elements.
return (
<div className="App">
<div
style={{
display: "flex",
justifyContent: "center",
marginTop: 30,
marginBottom: 30,
}}
>
<WalletMultiButton />
</div>
{publicKey ? (
<>
<h1>Seahorse Poll App</h1>
<h3>Vote for your favorite blockchain</h3>
<h2>Ethereum: {votes.ethereum} | Solana: {votes.solana} | Polygon: {votes.polygon}</h2>
<button onClick={() => vote(0)}>
Vote Ethereum
</button>
<button onClick={() => vote(1)}>
Vote Solana
</button>
<button onClick={() => vote(2)}>
Vote Polygon
</button>
<h3>Wallet Address</h3>
<p>
{publicKey.toString()}
</p>
<h3>Poll Address</h3>
<p>
{poll ? poll.publicKey.toString() : ''}
</p>
</>
) : (
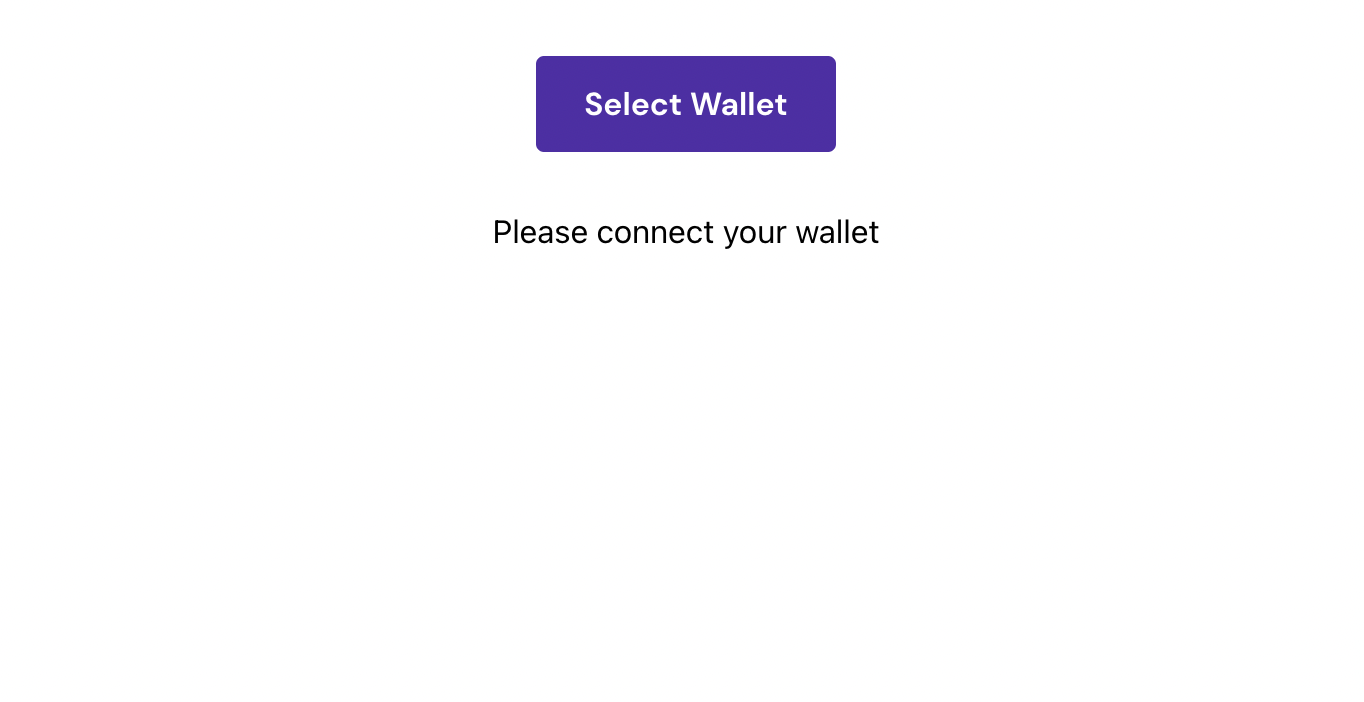
<p>Please connect your wallet</p>
)}
</div>
);
The UI consists of a wallet connection button, the poll information, vote buttons, and wallet and poll addresses. The vote buttons are connected to the vote function, which allows users to vote for their favorite Dapp.
App Component and Export
Finally, we have the App component, which wraps the Context and Content components.
const App = () => {
  return (
    <Context>
      <Content />
    </Context>
  );
};
export default App;
That's it! We now have a complete frontend for our Solana poll Dapp!
The final App.js code can be found here
Build and Run the App
To build and run the app:
npm start
- This will open the app in your localhost server, usually: http://localhost:3000/
- It should look something like this:
-
Press on
Select Walletand choose Phantom. If you don't already have it, install the chrome extension from here: https://phantom.app/download -
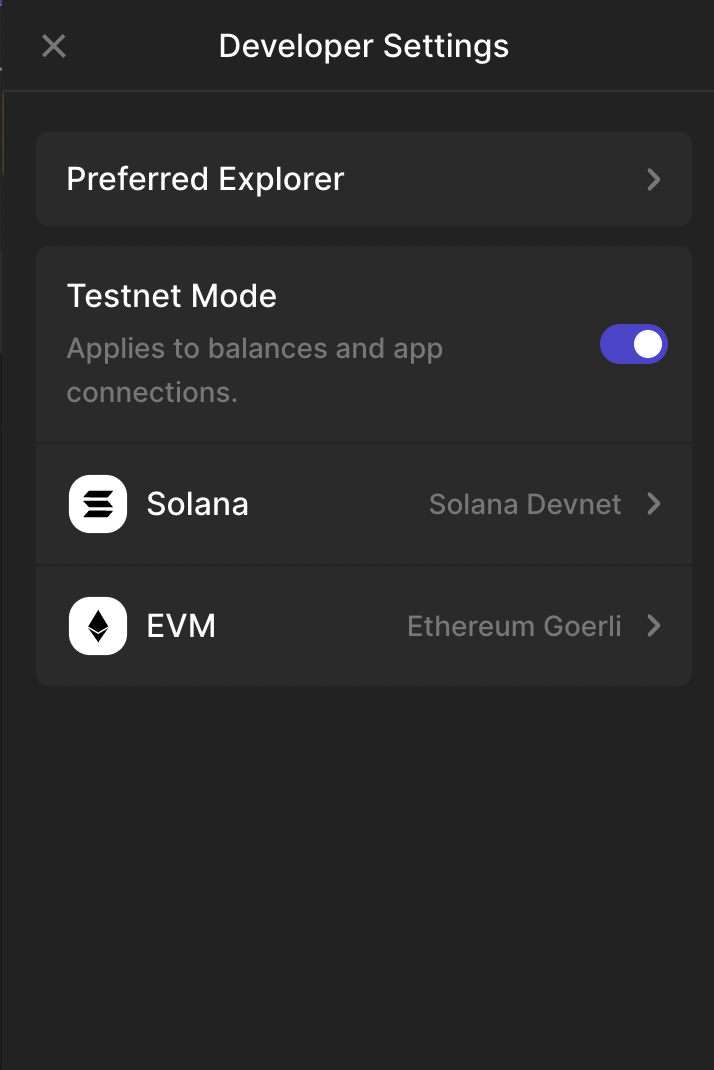
Make sure you switch networks by going on Settings -> Developer Settings -> Turn on Testnet Mode. This will switch your wallet to devnet.
- Once you're connected, you will see this screen:
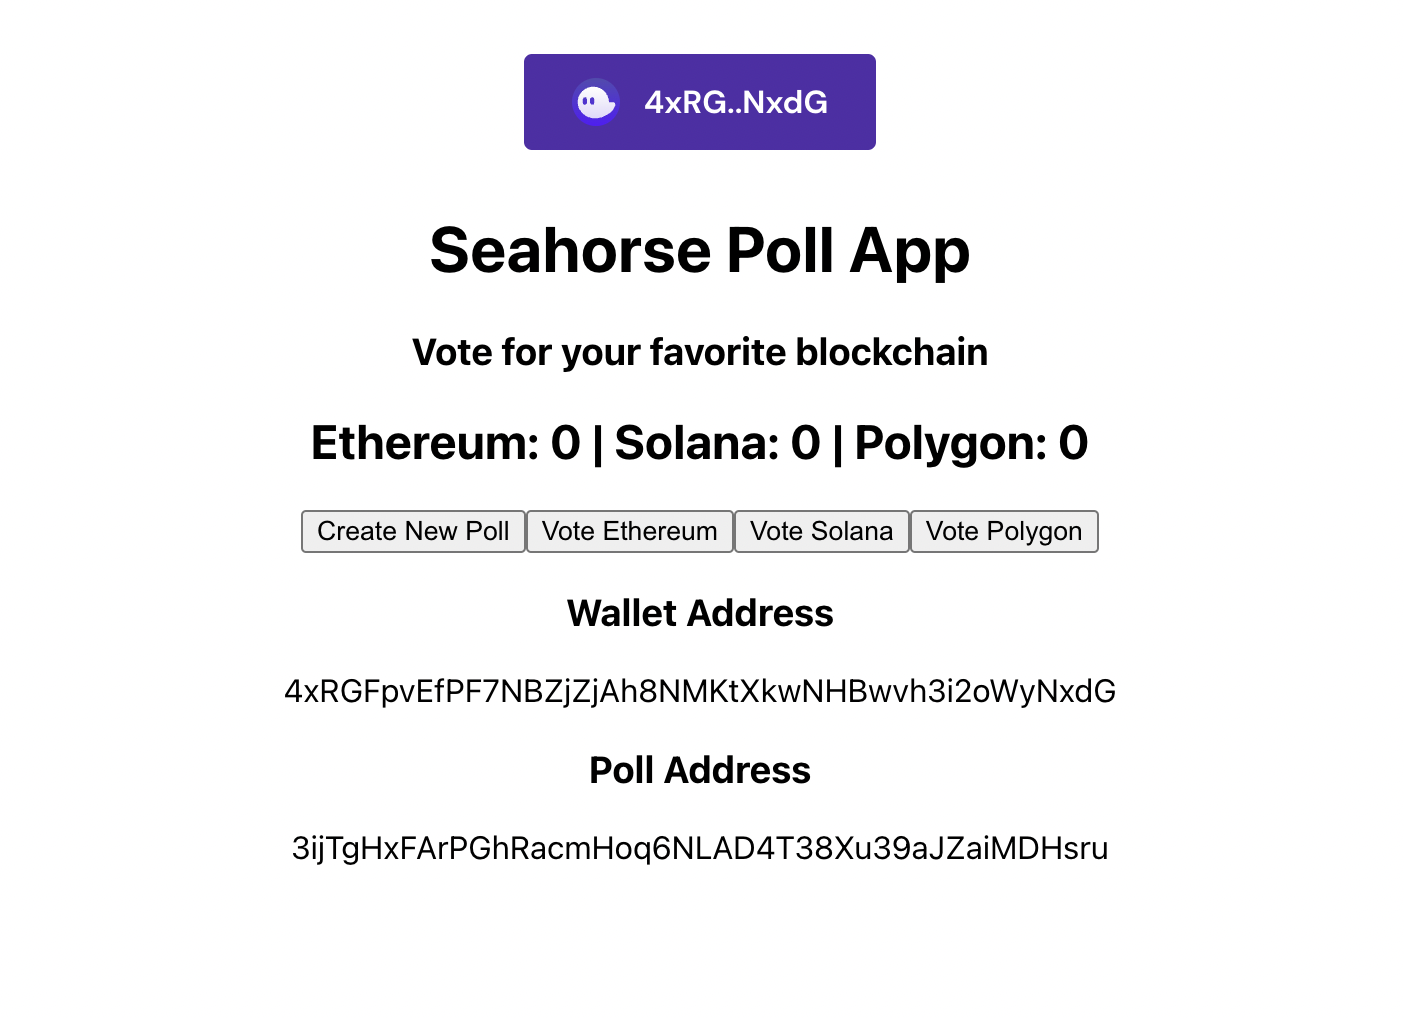
-
Here we can see our connected wallet address and our Poll address (already created by someone). If you don't see a Poll address we can create a new one.
-
Press on
Create New Poll. This will pop open the Phantom signature request modal for you to approve it.
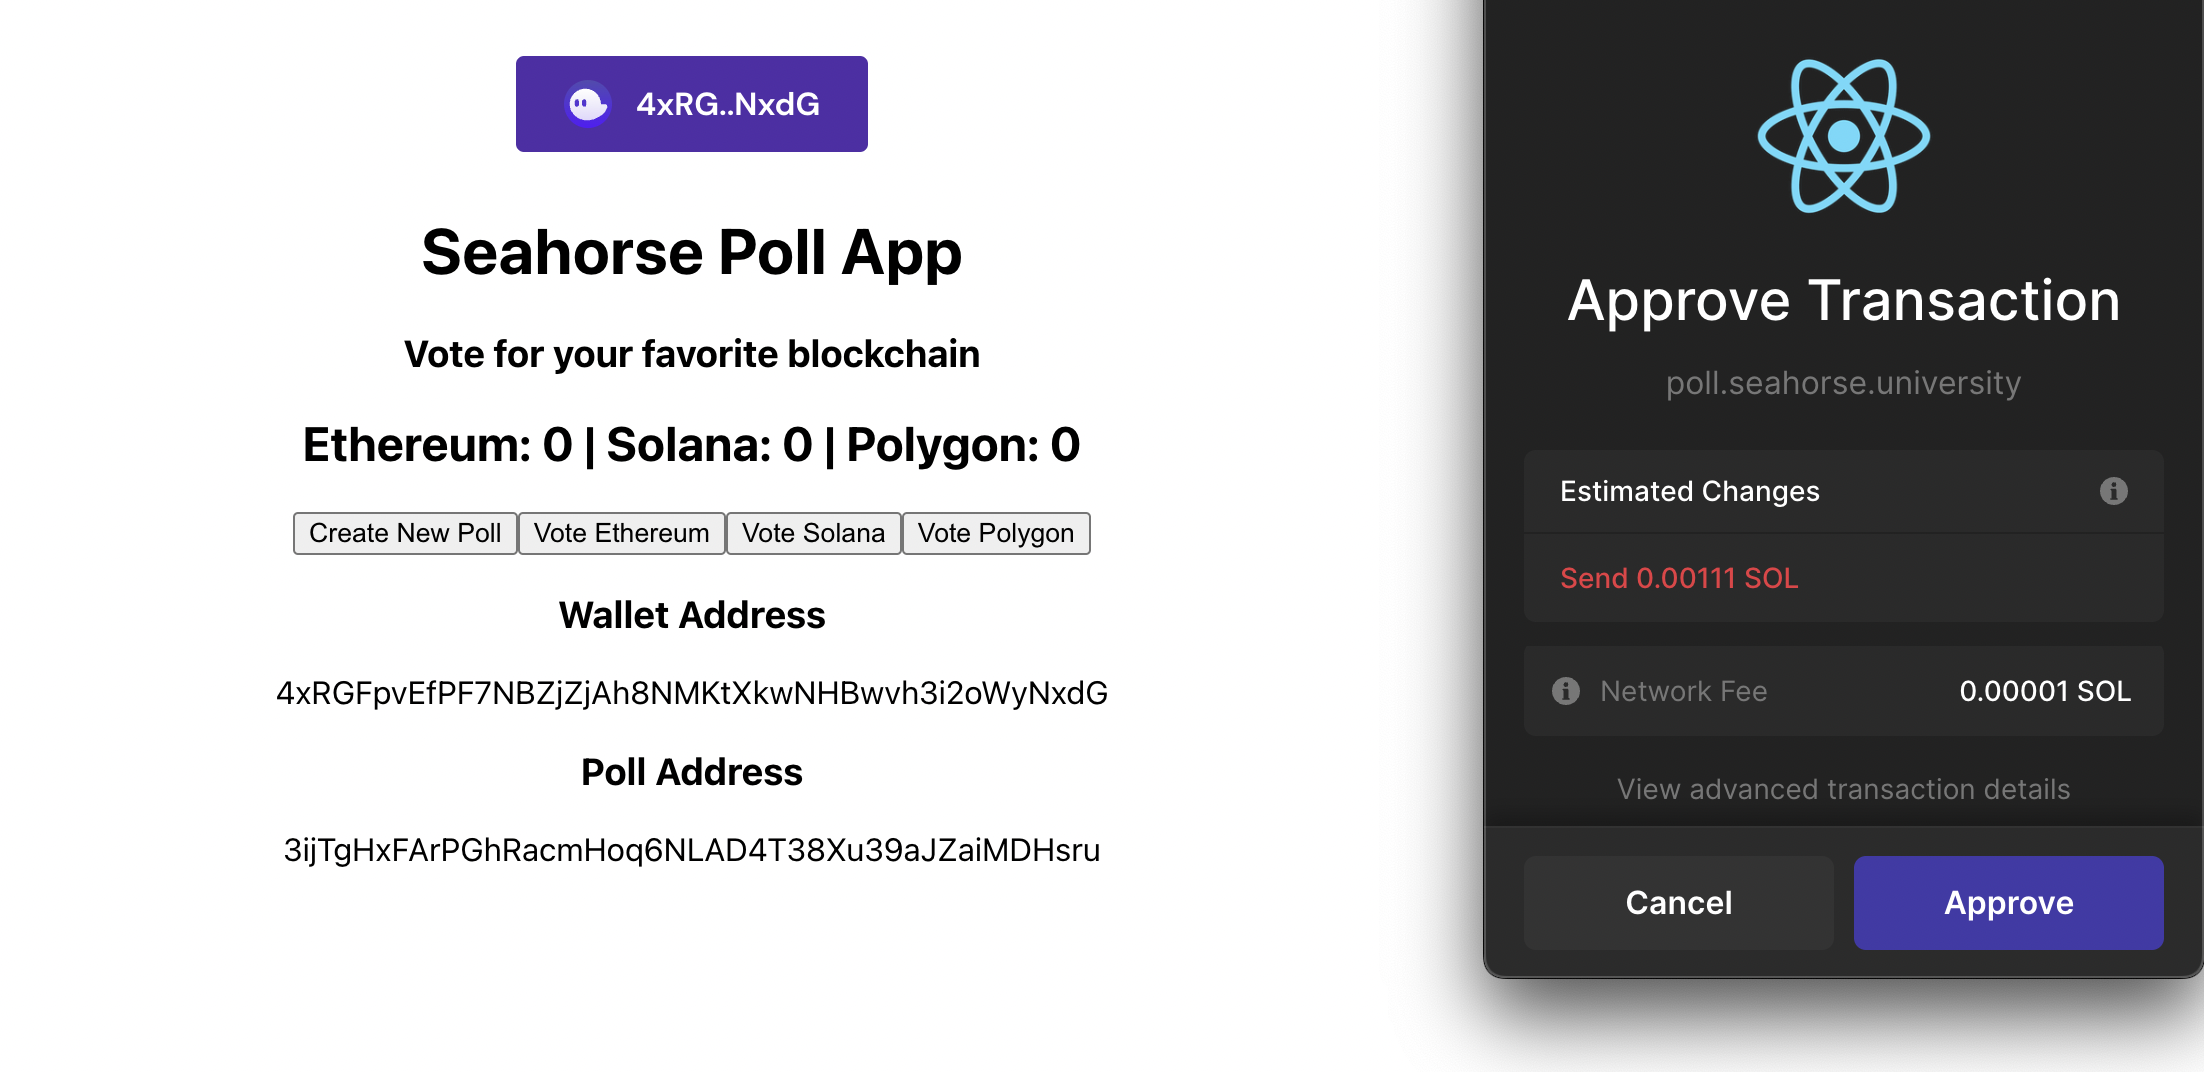
-
On approval, you will see that a new Poll has been created as the Poll address will change.
-
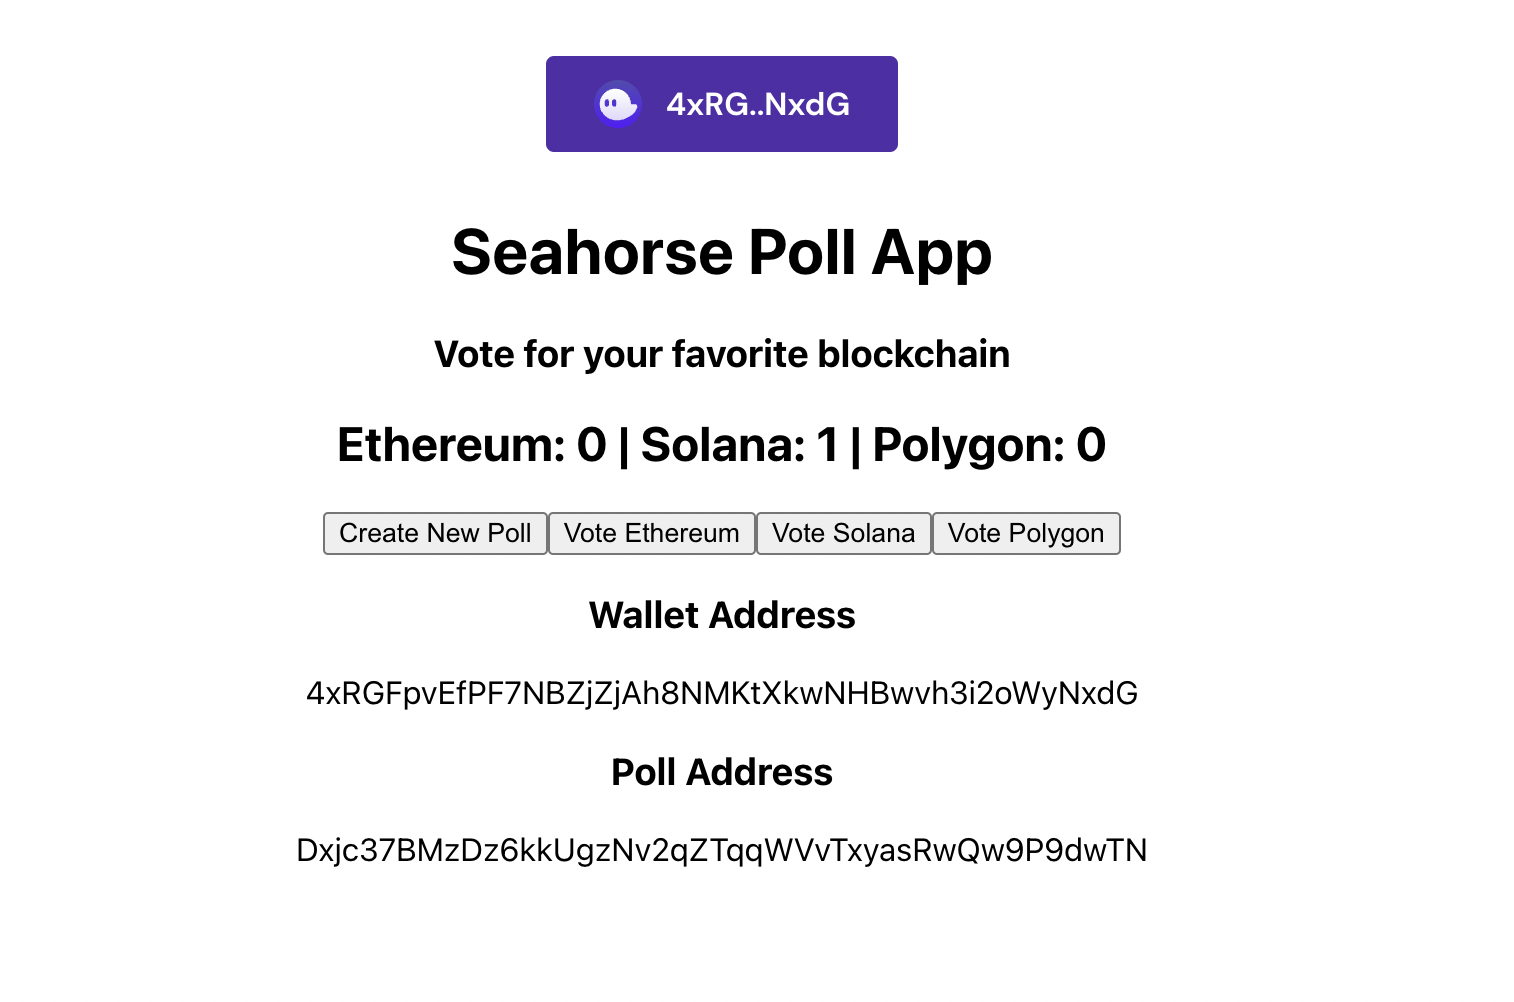
Its time to vote! Vote for Solana, this will open another wallet modal. On approving, we will see that the Votes for Solana are incremented to 1.
- Keep playing with it till you get a feel of what's happening.
Counter App
The Poll app was pretty easy. But it taught us some nice lessons about the Solana account model and Seahorse lang. The next program that we'll build is a Counter app. This app will be a very simple one, where a user can make a counter, and increment & decrement the counter. The counter stores the current state, ie, the count.
The core difference in the poll program and the counter program will be the usage of PDAs, or Program Derived Addresses. They are a very important feature in the Solana Account Model and we'll use them to build our program. More on that as we build it.
One more difference while building the program will be that we won't be using Solana Playground anymore. We will use the Seahorse CLI to natively write, build and publish the program. This is a very important step towards becoming a Seahorse pro!
Let us start with getting acquantied to the Seahorse CLI.
Seahorse Installation
Before we can start, we need to install some dependancies, including Seahorse.
Rust
Language which is used to code Solana programs. Go here to install Rust.
Solana Toolkit
Go here to install Solana and then run solana-keygen new to create a Solana keypair/wallet at the default location. This wallet will be used later for testing our Seahorse programs.
Node.js
Node.js can be installed by visiting here.
Yarn
Go here to install Yarn.
Anchor
Install avm using Cargo. Note this will replace your anchor binary if you had one installed.
cargo install --git https://github.com/project-serum/anchor avm --locked --force
On Linux systems you may need to install additional dependencies if cargo install fails. E.g. on Ubuntu:
sudo apt-get update && sudo apt-get upgrade && sudo apt-get install -y pkg-config build-essential libudev-dev
Install the latest version of the CLI using avm, and then set it to be the version to use.
avm install latest
avm use latest
Verify the installation.
anchor --version
Rustfmt
Seahorse uses rustfmt to help generate better-looking Rust code. Installation instructions here.
Seahorse
Cargo install the seahorse binary:
cargo install seahorse-dev
Verify the installation.
seahorse -V
Now that we've gone past the boring stuff, lets get started with coding our second Solana Program using Seahorse!
Initializing the project
We will initialise the project using the seahorse CLI:
seahorse init counter
This will create a directory counter which will contain a bunch of directories and files with the following structure:
counter
|\_ app
|\_ migrations
|\_ node_modules
|\_ programs
|\_ programs_py
    |\_ seahorse
    |\_ counter.py
    :
|\_ target
|\_ tests
app: will contain our front-end codeprograms_py: will contain our Seahorse programsprograms: will contain our generated intermediate Rust artifacts for our Seahorse programtarget: will contain the auto-generates TypeScript types for our programtests: will contain our Anchor tests
Now let's build our seahorse project:
cd counter
seahorse build
This should take some time for the first time, but now you'll notice some generated code in programs/counter/src/lib.rs which is the Rust artificat of the code in programs_py/counter.py.
Let's focus on counter.py file in programs_py and edit it to build our program.
Write Program
Let's write the program. As mentioned earlier, we will be building a counter app that lets users make, increment and decrement the counter. A key functionality here will be that the Counter will be a personal one, and no one else should be able to change its state.
Add accounts
Open programs_py/counter.py and replace the code there with the following:
from seahorse.prelude import *

declare_id('11111111111111111111111111111111')

class Counter(Account):
    count: u64
    user: Pubkey
This is similar to the Poll program:
from seahorse.prelude import *imports the necessary librariesdeclare_id('11111111111111111111111111111111'): Default ID - every Solana program starts with this ID, this is not your program's unique ID yet. This is needed to make sure your program knows its own key.
Directives
While your program doesn't support the use of any kind of top-level statement, there are a few special types of statements, referred to as directives, which provide you with greater control over the compiler beyond just the code generation. Currently, the sole directive available is 'declare_id', but future versions of Seahorse will introduce more.
Counteris the name of our account, which is derived from the in-built base classAccount- We define three data types, for which we need to define their type by using type-annotated fields with no default value.
count: the current count of the counteruser: the user that owns the counter
Add Instructions
Adding the Create Counter Instruction
Add the following code below:
@instruction
def create(counter: Empty[Counter], user: Signer):
    counter = counter.init(
        payer=user,
        seeds=["counter", user]
    )
    counter.user = user.key()
Let's take this step by step.
create(counter: Empty[Counter], user: Signer)`
@instructionis the decorator that tells Seahorse that the proceeding function is an Instruction definationcreateinstuction has two parameters:counter: of typeEmpty[Counter], to initialise an account of typeCounterby this instruction.user: of typeSigner
counter = counter.init(
    payer=user,
    seeds=["counter", user]
)
-
Invoking the
.init()function on an Empty account initiates it. It requires two parameters:payer: the account responsible for covering the rental costs of the newly initialized accountseeds: these are the seeds used for the program-derived address (PDA).
-
The
.init()function returns the newly created account, which can now be utilized as a Counter
counter.user = user.key()
- The next step is to define the
ownerfield. To retrieve the public key of the user who signed the instruction, we user the.key()method on it.
PDAs
Program-Derived Addresses (PDAs) are covered in great detail in the PDAs section. When you create an account through your program, it requires a unique list of identifiers to differentiate it from all other accounts created by your program. In the context of Seahorse, these identifiers can either be string literals or different accounts. PDAs are useful as they do not have private keys, hence key management becomes really easy - developers do not have to store keys.
Adding Reset, Incement and Decrement Instructions
Add the following code to the file:
@instruction
def reset(user: Signer, counter: Counter):
    assert user.key() == counter.user, "Unauthorized"
    counter.count = 0

@instruction
def increment(user: Signer, counter: Counter):
    assert user.key() == counter.user, "Unauthorized"
    counter.count += 1

@instruction
def decrement(user: Signer, counter: Counter):
    assert user.key() == counter.user, "Unauthorized"
    counter.count -= 1
- These three instuctions are pretty similar in what they are trying to achieve - to change the state of our Counter PDA.
- All three take two args:
userandcounterwhich represent the user who owns the Counter, and the Counter PDA itself, respectively. - We use
assertto check if theuser.key()is same as thecounter.user.- What this means is that we want to check if the user which is triggering and signing the instruction is same as the user who owns the Counter PDA.
- If not, we program log
"Unauthorized"to make sure unauthorised personnel can't access and change the state of our Counter.
Voila! We are done with our program. The full program code can be found here.
Built the Program
- Build the program using Seahorse CLI like we did before:
seahorse build
- This time it should take only a few seconds to build the program and make rust artifacts in
programs/counter/src/lib.rs. - This command also produces an IDL file. IDL is an acronym for "Interface Description Language". It's essentially a JSON file that comprises all the specifics of our Solana program. This includes details about its instructions, the parameters these instructions demand, the accounts created by the program, and so forth.
- The purpose of this IDL file is to feed it to our JS client later on so we can interact with our Counter program in a structured manner, like we did for the Poll program.
Introduction to Solana
This tutorial is meant to be for a spectrum of readers:
-
Those experienced in the EVM space
-
Those new to web3
-
Non-developers
We will be going through some of the core concepts in Solana's architecture. These are basic building blocks for every action on this chain. The concepts we are going to discuss are not only beneficial to understand for aspiring developers but also for end users to make the most out of the experience of fast and cheap transactions on Solana.
Let us start with understanding how to read data on-chain. This will give us more context for the theoretical concepts we discuss later.
The Block Explorer: a window to the chain
Block explorers are online interfaces which provide the user a chance to search for past and on-going transactions, wallet addresses and other useful info on a given chain. This provides a dimensionality of transparency between the chain and its users.
Solana has several block explorers to choose from:
Throughout the tutorial, we'll see examples right from the block explorers that juxtapose the theory we discuss. Here are some of the words you'll see often throughout the tutorial:
-
Blocks, Validators and Proof of History
-
Accounts
-
Instructions and Transactions
-
Programs
-
Token Program
-
Token Metadata Program
-
Program Derived Addresses (PDA)
-
SPL-tokens, Fungible Assets and Non-Fungible Tokens (NFTs)
Let's start from the very top. What is a Blockchain?
Blocks, Validators and Proof of History:
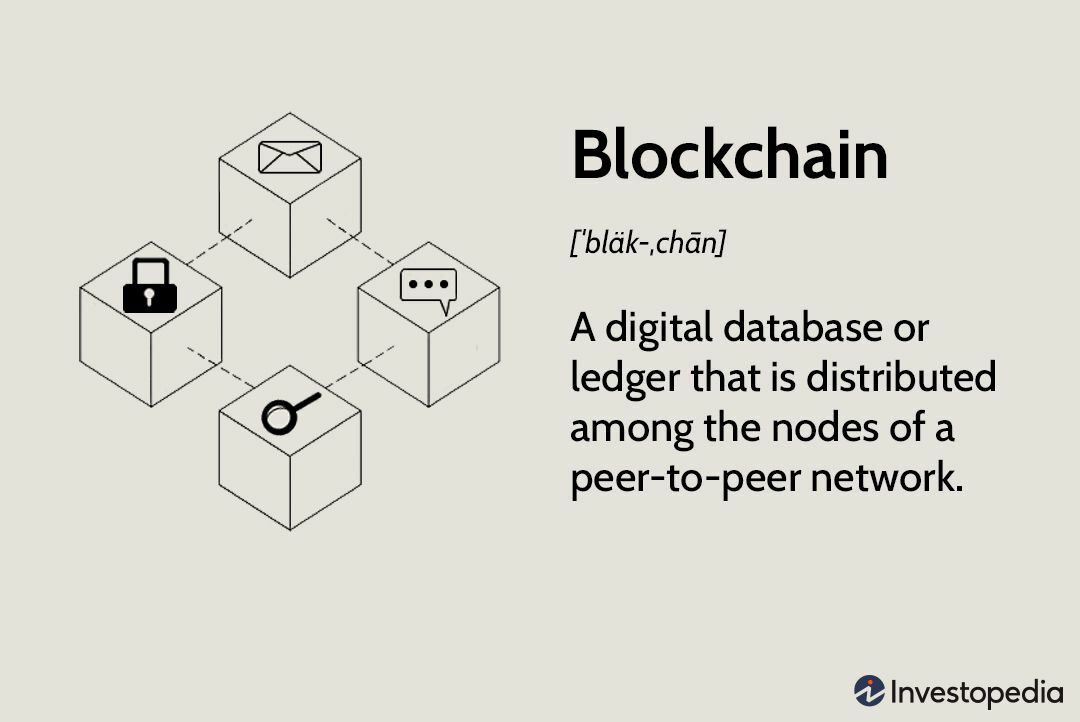
Without going into the depths of the jargon ocean, a blockchain is simply a digitally distributed database. The key difference between a typical database and a blockchain is how the stored data is structured.
A blockchain stores and manages data into small groups known as Blocks. A block usually stores important information like input and output hashes, number of transactions and the event it contains. When a block is filled with data or "created" by a blockchain node, it is linked to the previous blocks. This forms a chain of blocks, or a blockchain.
In the case of Solana, when a node claims to have created a block, the other nodes strive to verify this claim. The node that generated the block is known as the Leader and the nodes that verify the claim are known as Validators.
How does this validation, or consensus work on Solana? The answer is something called Proof of History (PoH)
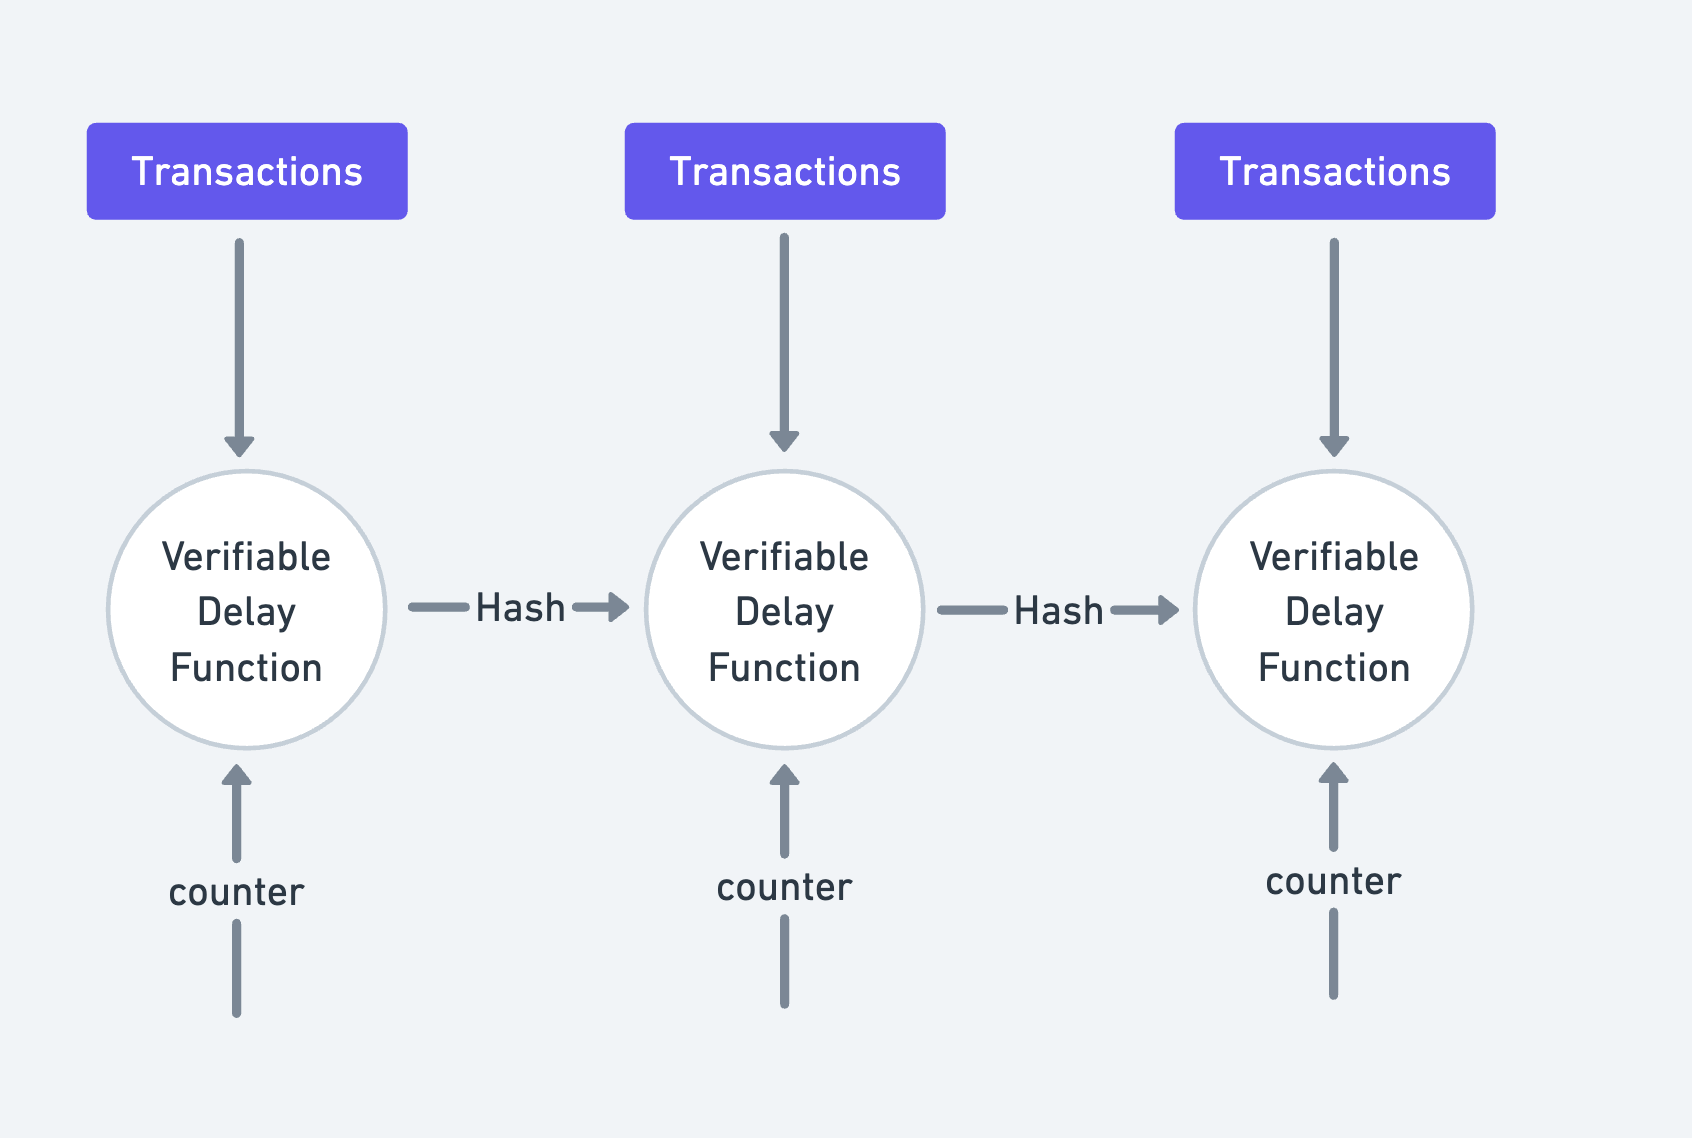
"Proof of History is exactly what the name suggests: a proof of historical events", Anatoly Yakovenko.
PoH is a SHA-256 hashed, verifiable delay function (VDF): this function guarantees the following: when the output hash is validated for an input hash, it is by the nature of PoH that we can confirm that some time has passed since we provided the input. This very nature of the VDFs insures the super fast speeds of the Solana blockchain.
This is exactly what makes Solana unique. Its extremely easy, fast and cheap-to-use nature allows itself to be named the world's first web-scale blockchain.
Coming back to how Validators prove that the Leader node is the node that generated the block: the Validators run the above PoH VDF on a number of transactions existing on the block to be verified. The outputs of the VDF are then compared with the outputs provided by the Leader node. Once proven, the Leader is then confirmed to have created the block and rewards for validation are distributed to all the validators, including the Leader.
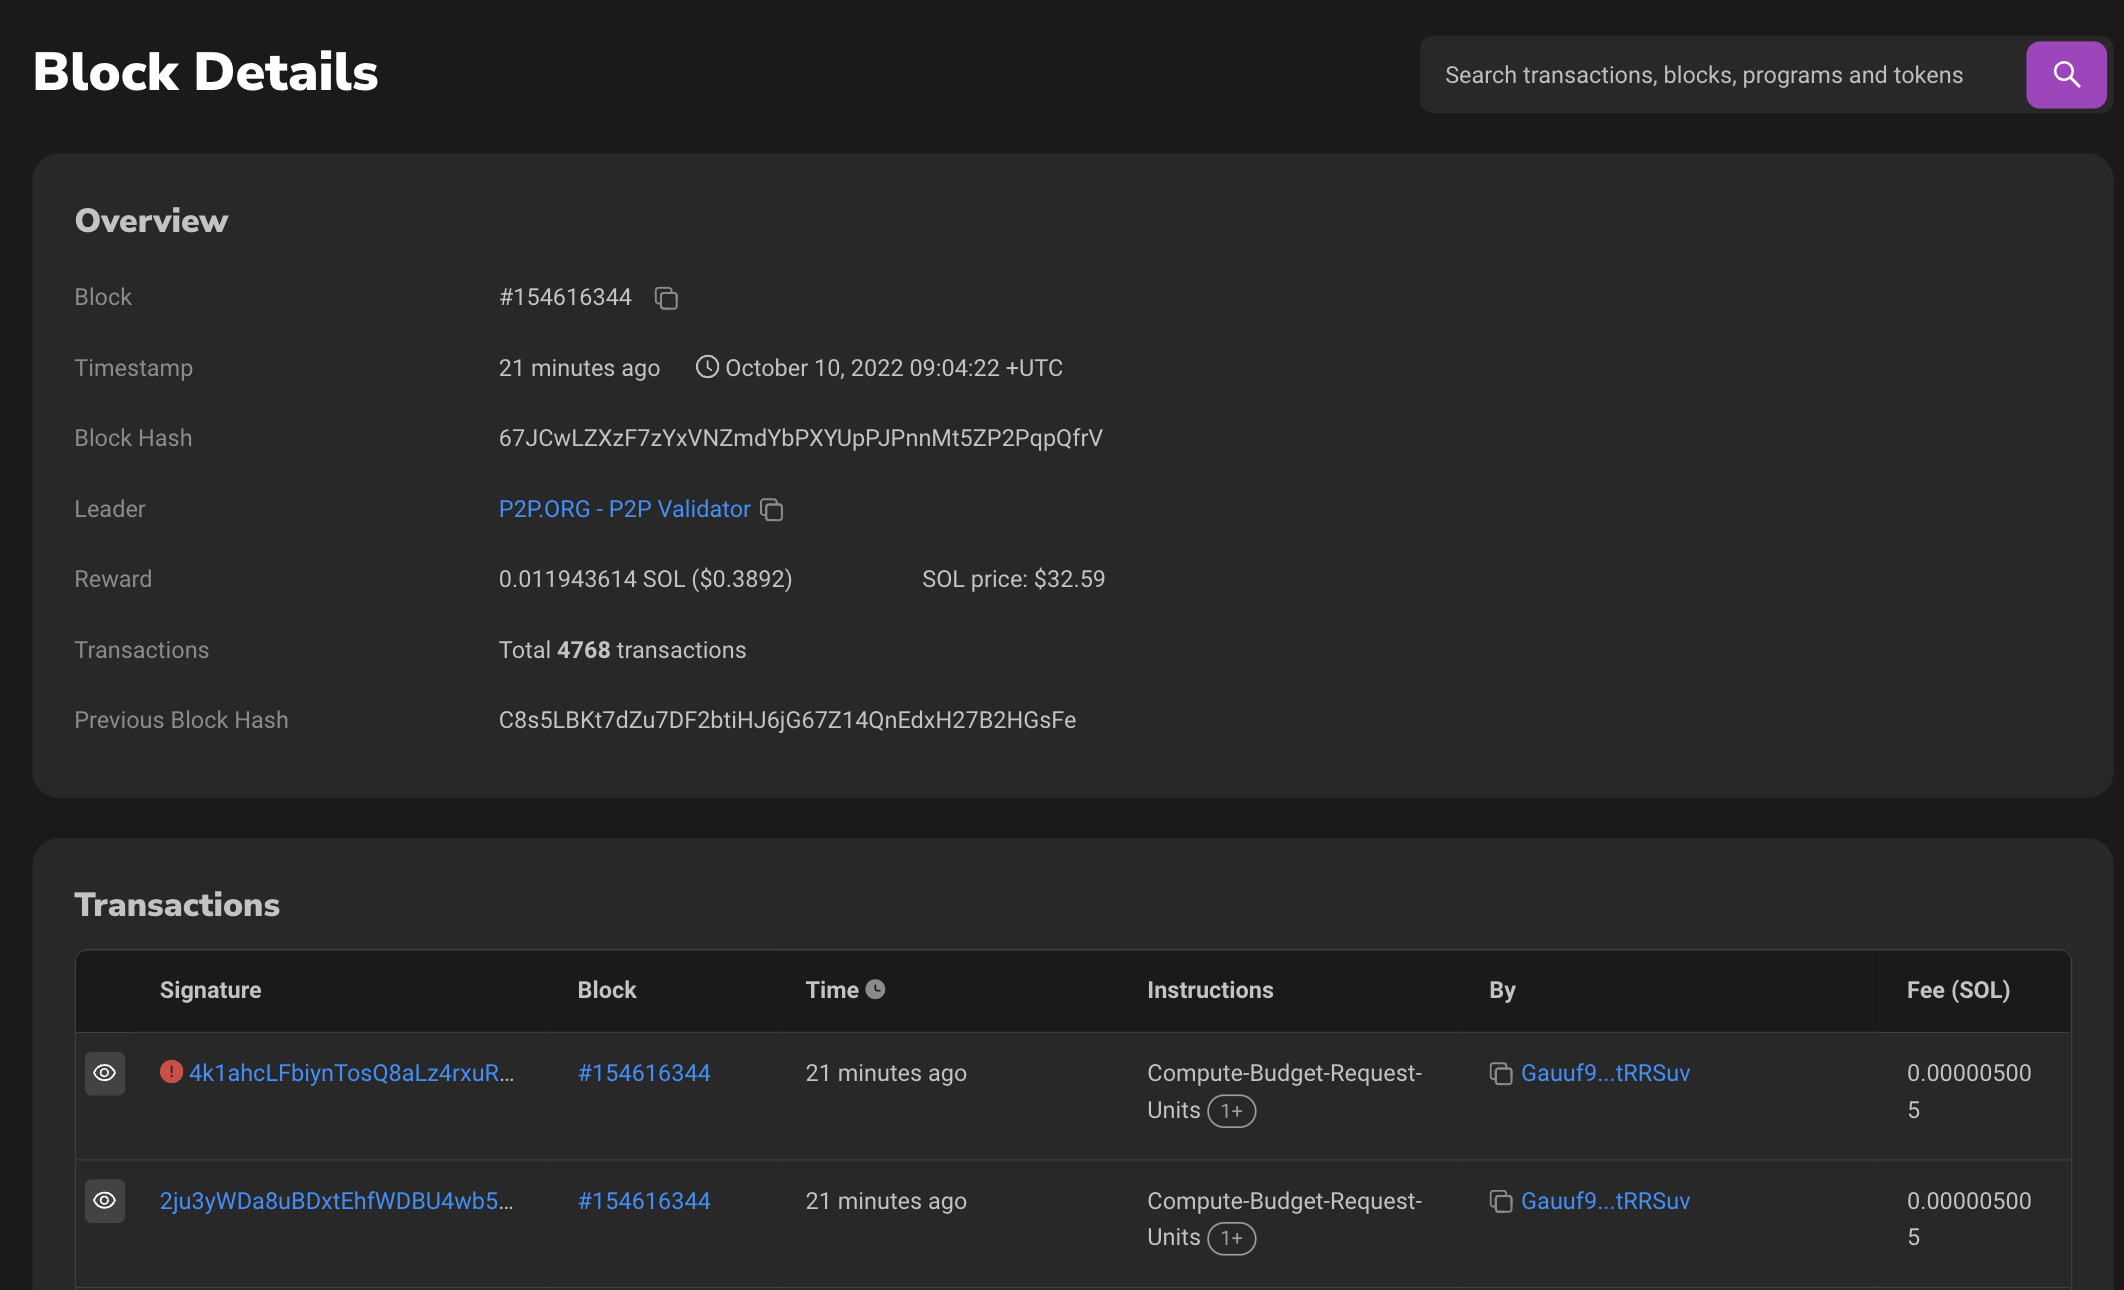
In the above view of a given block #154616344, we can see a variety of information.
-
Block Hash: The SHA-256 hash (reference number) for a given block on chain.
-
Leader: The block hash of the node that created the given block.
-
Previous Block Hash: The parent block's # of the given block.
-
Reward: The total rewards distributed to the Validators.
-
Transactions: The total number of transactions (successful + unsuccessful) executed in the given block.
Now, if you click on one of the hashes in the By column of the Transactions section, we land on a page which gives a detailed overview of the Account with hash GFDmfhoPtZZATNxw8zyZPVYKkBZutf1zoZTbRbxDjh5E.

Let us first go through some theory and after which we can truly understand the account page and all its components.
Accounts
Solana's Account model is very unique and is partially responsible for why it's so fun to build apps on it.
On any blockchain, decentralised apps need to track the current state: number of tokens, NFTs transferred, current highest bidder in an auction, orders for a token on a dex etc. These states need to be saved in data storing units on-chain, called accounts.
On EVM, smart contracts are executable pieces of code or programs. They are accounts themselves and store their own data. The code inside the smart contract defines how the data within the account is going to be modified.
On Solana, Accounts and on-chain programs interact differently. On-chain executable programs are stored in immutable accounts (mutable only by the authority if the program is marked mutable), whereas data that the executable programs interact with is stored in mutable accounts.
All accounts on Solana are assigned a Program as the owner and only these owners are allowed to make changes to the data (or debit SOL) from a given account. Important to note here: anyone can credit funds permissionless-ly to an account.
A developer coming from the EVM space might find this state-less Account Model to be a little confusing and complex. But this model allows something which is not possible in other chains: Transaction parallelisation. We are going to talk more about this in the following section.
On Solscan's page for account GFDmfhoPtZZATNxw8zyZPVYKkBZutf1zoZTbRbxDjh5E, we can see that the account holds some SOL and has some tokens. We'll discuss what tokens are later. But for now lets check out the section for Transactions. If you click on any one of the Signatures of these transactions, we'll land on a new page which shows some Transaction details. Before we dive deep into this, let's understand what transactions are.
Instructions and Transactions
Instructions are the basic operational units on Solana. Instructions are commands that can be bundled up together to form Transactions. These transactions can then be executed by a Program to read and/or write data from one or more Accounts. The instructions that form the transaction are executed atomically, or one-by-one in the order in which they were added to form the transaction. If one instruction fails, the entire transaction is invalidated.
An instruction takes the following data:
-
program_idof the Program which owns the accounts who's states are going to change -
Array of all
accountsthe instruction intends to read/write data from. -
instruction_dataarray which specifies more metadata intended for the programprogram_id.
One of more of such instructions are then bundled to form the transaction which needs to specify the following data before it can be executed:
-
Array of all
accountsit intends to read/write data from. -
Array of all
instructionsthe transaction wants to specify in the very same order the user wants to execute them -
Recent
blockhash: this is required to prevent duplication and stale transactions. The max age of transaction is 150 blocks. -
signaturesof all accounts the given transaction intends to debit from or to write data into. This signature array needs to be in the same order of the corresponding accounts in theaccountsarray.
While we are talking about transactions, it's important to also talk about the Transactions per Second (TPS) of the network. Solana is famed to have one of the highest TPS of any chain.
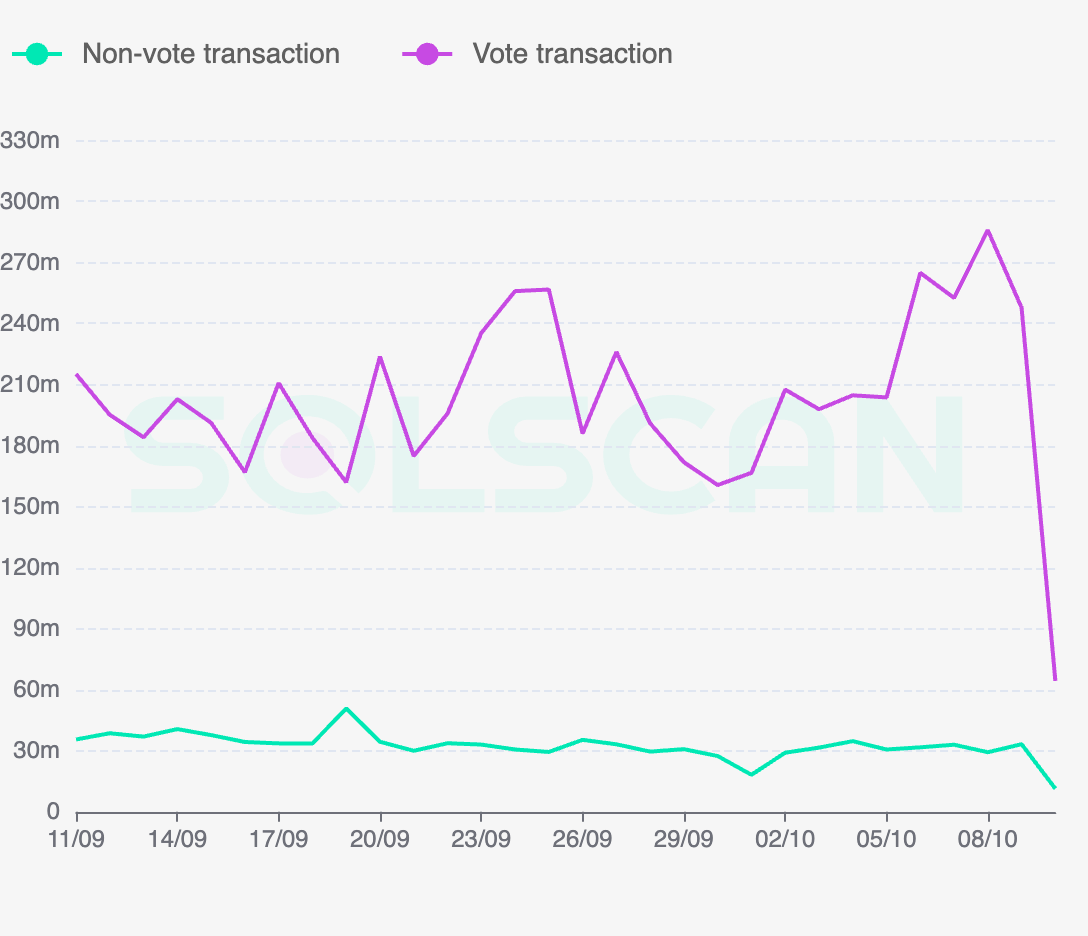
There are two types of transactions Vote and Non-Vote transactions. Vote transactions are used to do the network validation as described in the Proof of History section and hence are not the "true" transactions being utilised for doing the actual work like transferring NFTs / tokens, bidding, selling etc. The graph above shows that in the last 7 days, the number of Vote transactions are almost 7 times as much as the Non-Vote transactions. This plays into the true TPS (Transactions per Second) debate of Solana: although Solana is blazingly fast with reported TPS touching averaging >3k, the true TPS (removing transactions for Voting) is <1.5K.
Now that we know what transactions and instructions are, we ought to understand who actually triggers/interacts with them. The answer is Programs.
Programs
We have mentioned Programs quite a lot of times in this tutorial. But what exactly are Programs?
The equivalent to smart contracts on Solana are Programs. Programs are nothing but executable code that is stored in Accounts marked as executable.
The way Programs differ from Smart Contracts is that Programs on Solana are stateless, i.e., they do not store the data that they are processing and acting on. Programs are stateless and all data must be passed in via separate accounts from the outside. This allows the processing of data in a parallel fashion: multiple programs can reuse the same accounts for different purposes, in different transactions.

You can imagine this parallelisation to be something similar to how functions in programming work. In programming, we can define variables to store some data. These variables can then be passed as reference to functions that make changes to these variables. In this analogy, the variables are Accounts and the functions are Programs.
Coming back to the Solscan page for a transaction with signature 3bsfEaCdbjcBvXQT3Fx85R2TvKL3KJe5kb4G8XYqUFXCBxKzemu6FV3fi2C51TBtcKpjygCfzdXsjg9dTjVxpEo5, we can start to understand what its trying to tell us.
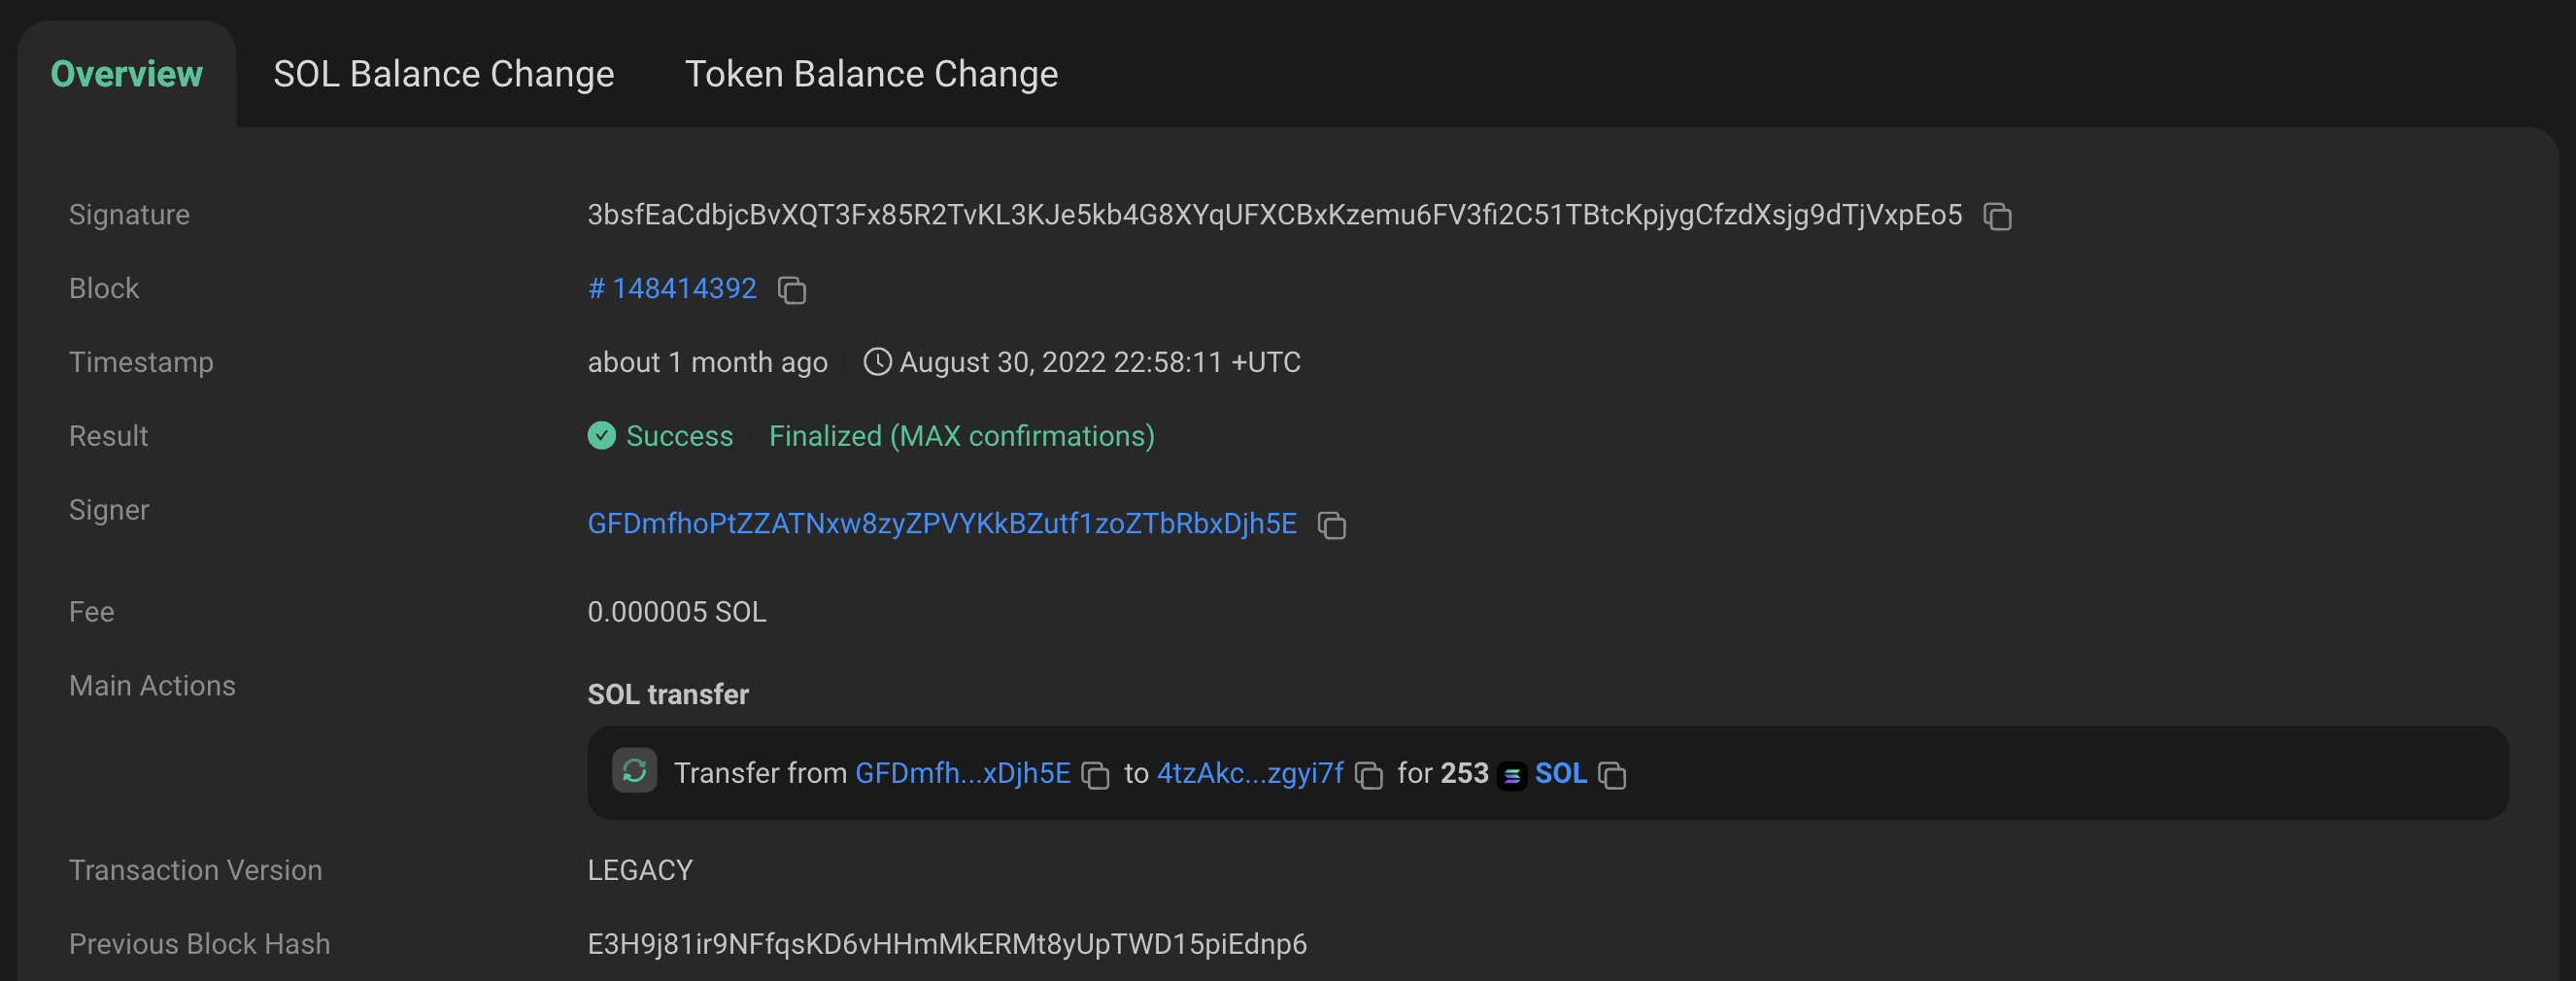
In the transaction overview, we can checkout the block in which the transaction was executed, the fee to run the transaction, whether the transaction was successful or not and most importantly, the main actions that the transaction executes. In this case, there was a transfer of 253 SOL from wallet GFDmfhoPtZZATNxw8zyZPVYKkBZutf1zoZTbRbxDjh5E to 4tzAkc7cGTns1dsVaP18KvMkt9jEmzA1AaV3rMzgyi7f.
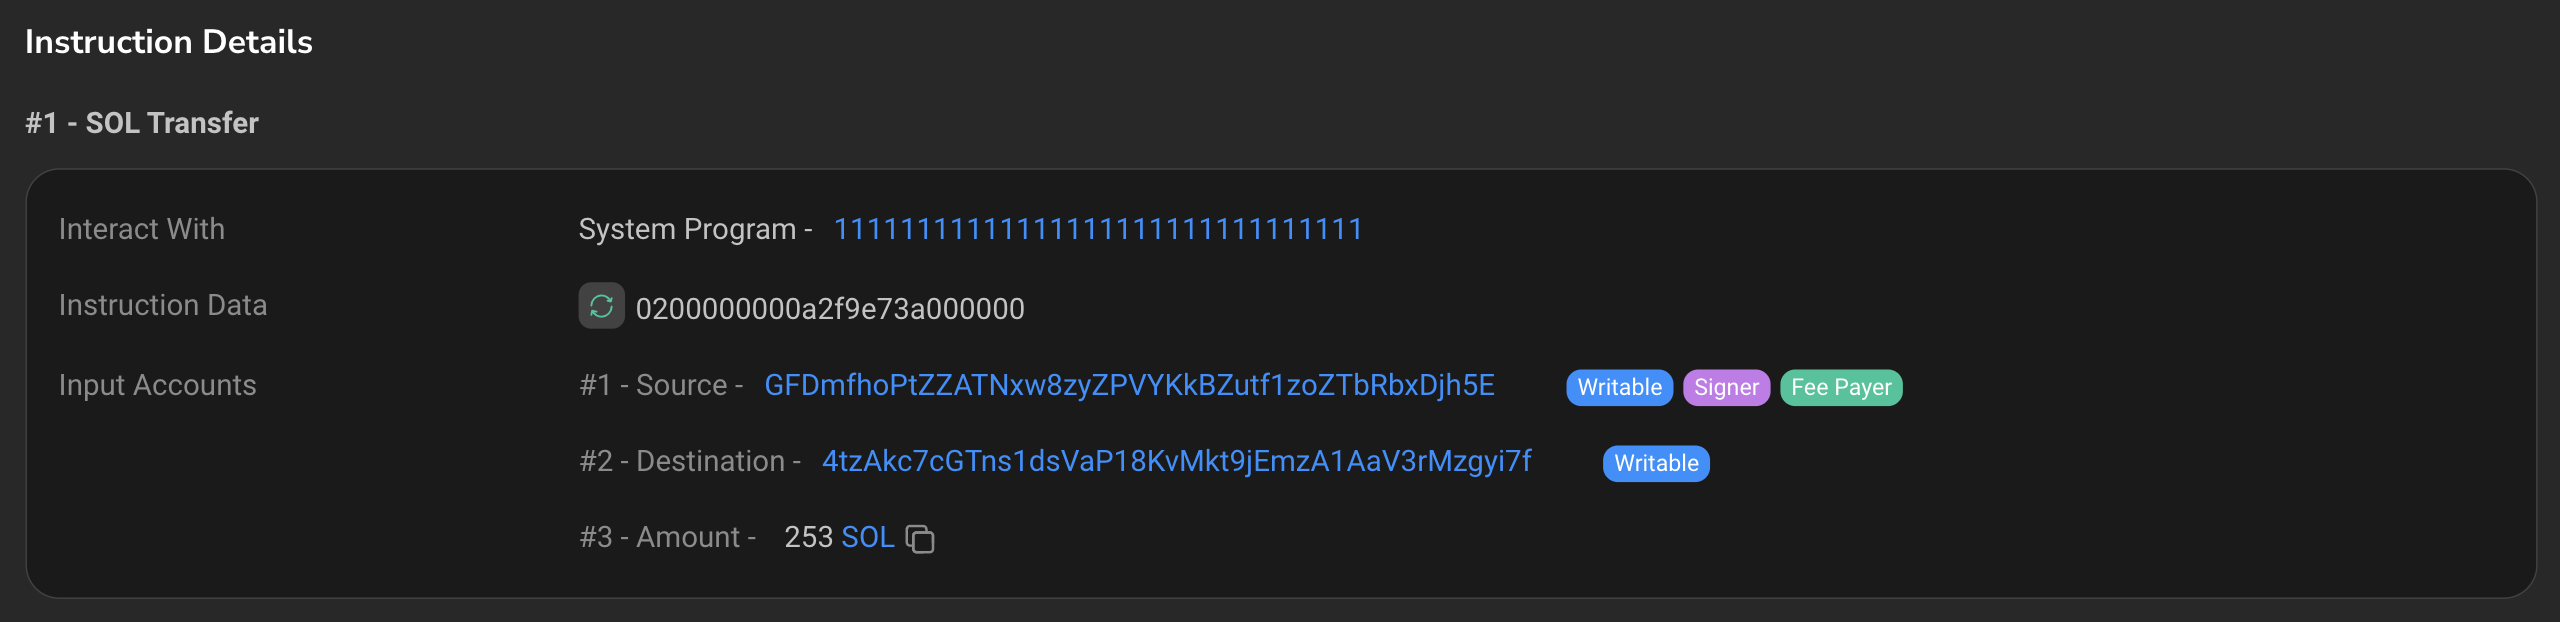
We can also see the same on the instruction detail. In the given transaction, only 1 instruction was executed. As it was a simple SOL transfer, the program which interacts with the transaction is the System Program, with hash: 11111111111111111111111111111111.
If we go back to the Account page on Solscan, we can see a section for Token Accounts and also see some SPL-tokens listed. Let us see what these are.
SPL-tokens, NFTs and the Token Program
Like any other blockchain, Solana has tokens as well. These are assets that exist on-chain and can be traded from person to person or through secondary marketplaces. These tokens fuel several use-cases of blockchain technology like DeFi and are important for retail adoption of the crypto-economy.
All tokens on Solana are made with Solana's Token Program and follow Metaplex's Token Metadata Standard. Let us see how these programs play together to form different tokens on Solana.
Token Program
Solana's Token program is responsible for defining the common implementation for all tokens on Solana.
The spl-token-cli is a part of the Token program and allows the generation of tokens using command line:
spl-token create-token
You can follow the following reference guide to play around with the CLI but we won't go too deep into the specifics in this tutorial.
To fully understand how tokens work on Solana, its important to understand the account model of the Token program.
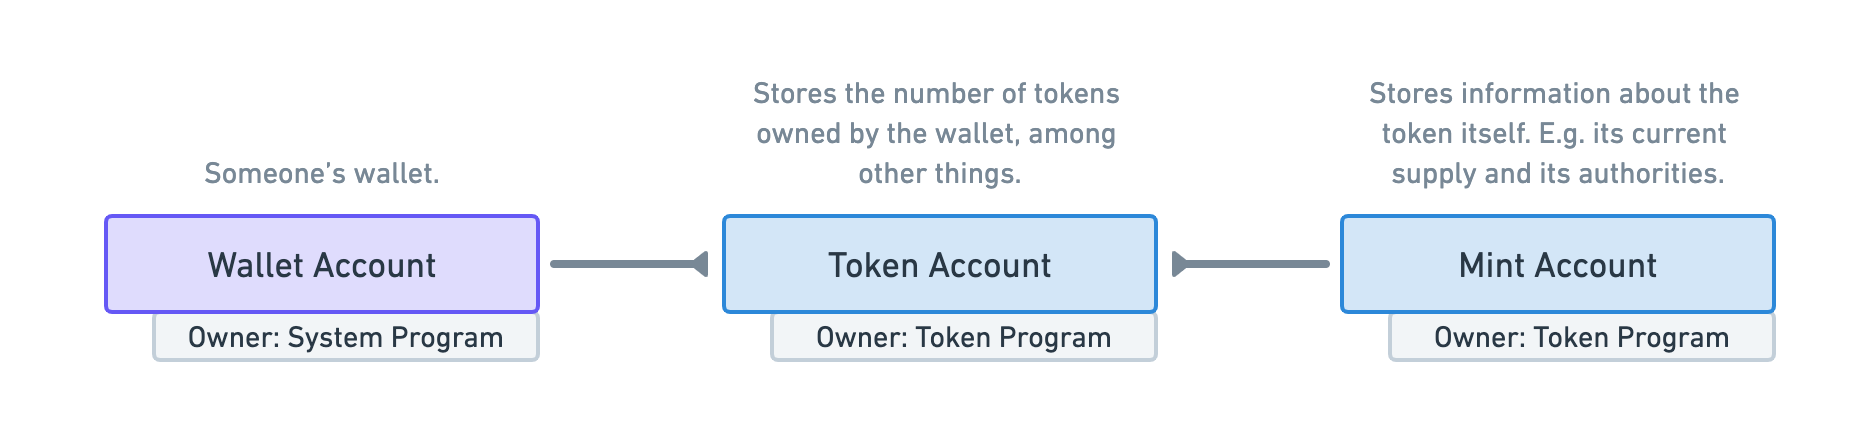
In the image above we can see 3 accounts: Wallet Account, Token Account and the Mint Account. The Wallet Account is owned by the native System Program and represents a user's wallet. The Token Account and the Mint Account are owned by the Token Program.
-
The
Mint Accountis responsible for storing global information regarding the Token, like current supply,Authority(the account address which has the authority to make changes to the given Account), token name, decimals, number of holders etc. -
The
Token Accountis responsible for storing the relationship between theWallet Accountand theMint Account. This account stores data like the number of tokens held by the wallet etc.
Associated Token Account Program
While discussing Token Accounts, its important to mention about the Associated Token Accounts. Why are these needed?
Given a wallet account and mint account, we can derive a unique token account and we call that the ATA. There can be more than 1 token accounts for a given token in a wallet. When a user sends a token from wallet A to wallet B, the user does not know which token account to specify as the destination token account. To solve this problem, associated token accounts are used to deterministically derive a token account address from a user's System Account (wallet) and the mint address.
While the Mint Account stores some global information regarding tokens, it is not capable of storing enough data to be able to be standardised and used globally by dapps and wallets. Here's where Metaplex's Token Metadata Program comes in.
Token Metadata Program
The Token Metadata Program is used to attach additional data to all tokens on Solana. This allows wallets, dapps and even block explorers to present tokens in a standardized way, creating a uniform user experience across the ecosystem.
To enhance Mint Accounts with additional metadata, the Metadata program uses a concept called Program Derived Addresses (PDA).
Program Derived Addresses (PDAs)
When we discussed Accounts, we talked about the need for the account's owner to sign transactions whenever a program makes a change to the said account.
This is problematic and not always possible. Imagine a use-case where we are counting the number of tokens in a given account and this number needs to be saved on-chain. The account's owner will have to sign transactions each time this number changes.
An ingenious solution to this is PDAs. PDAs envelop accounts that can be programmatically controlled by certain programs. This allows programs to sign on behalf of these accounts without requiring a private key, as shown below.
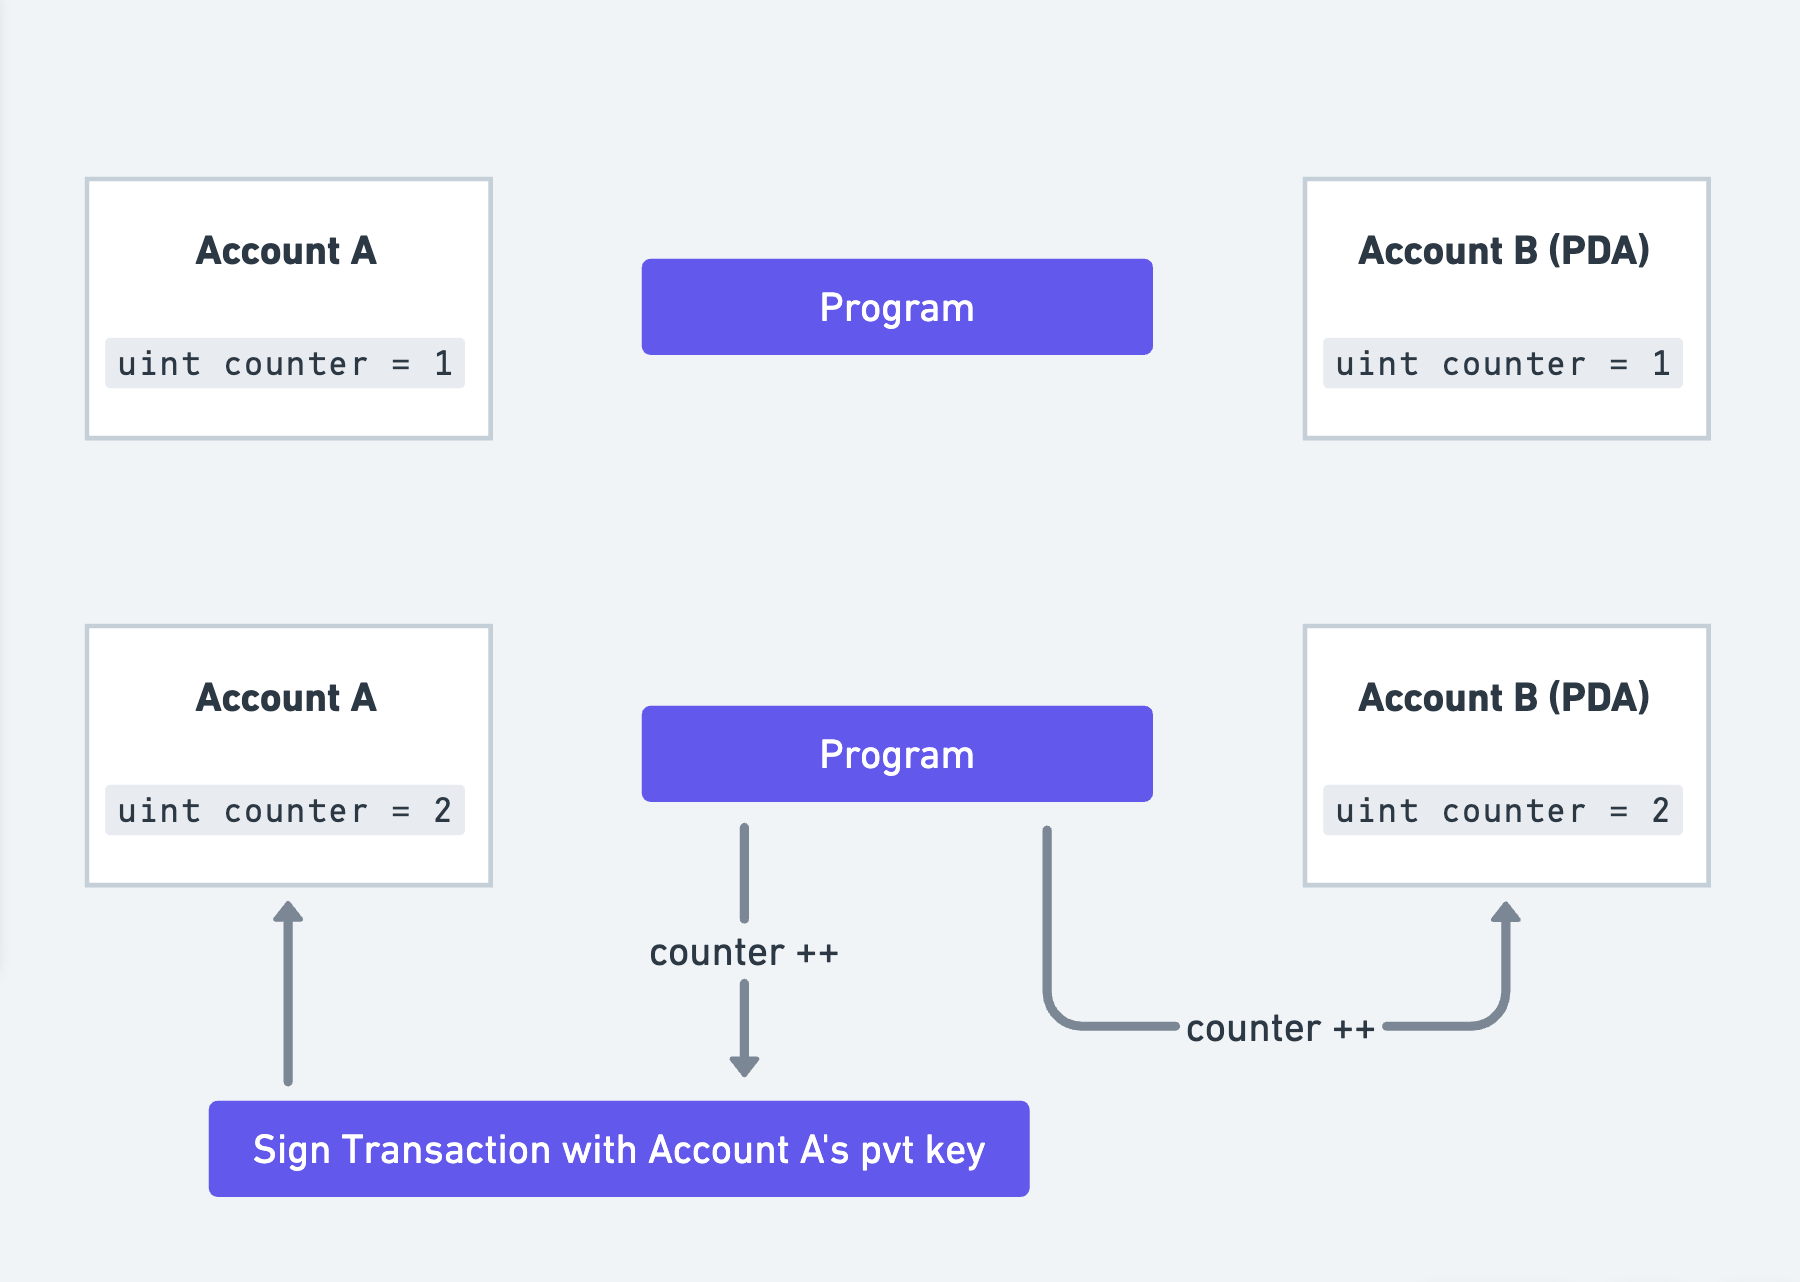
PDAs are deterministically derived from a
program_idand a string (also known as seeds) like"auction_house"or"token_metadata". If you want to dive deep into how PDAs are generated, I highly recommend reading Solana Cookbook's PDA guide.
To attach additional data to a Mint Account, the Token Metadata Program derives a PDA from the Mint Account’s address. This PDA is then used to store a Metadata Account with the Mint Account using a PDA as shown below.
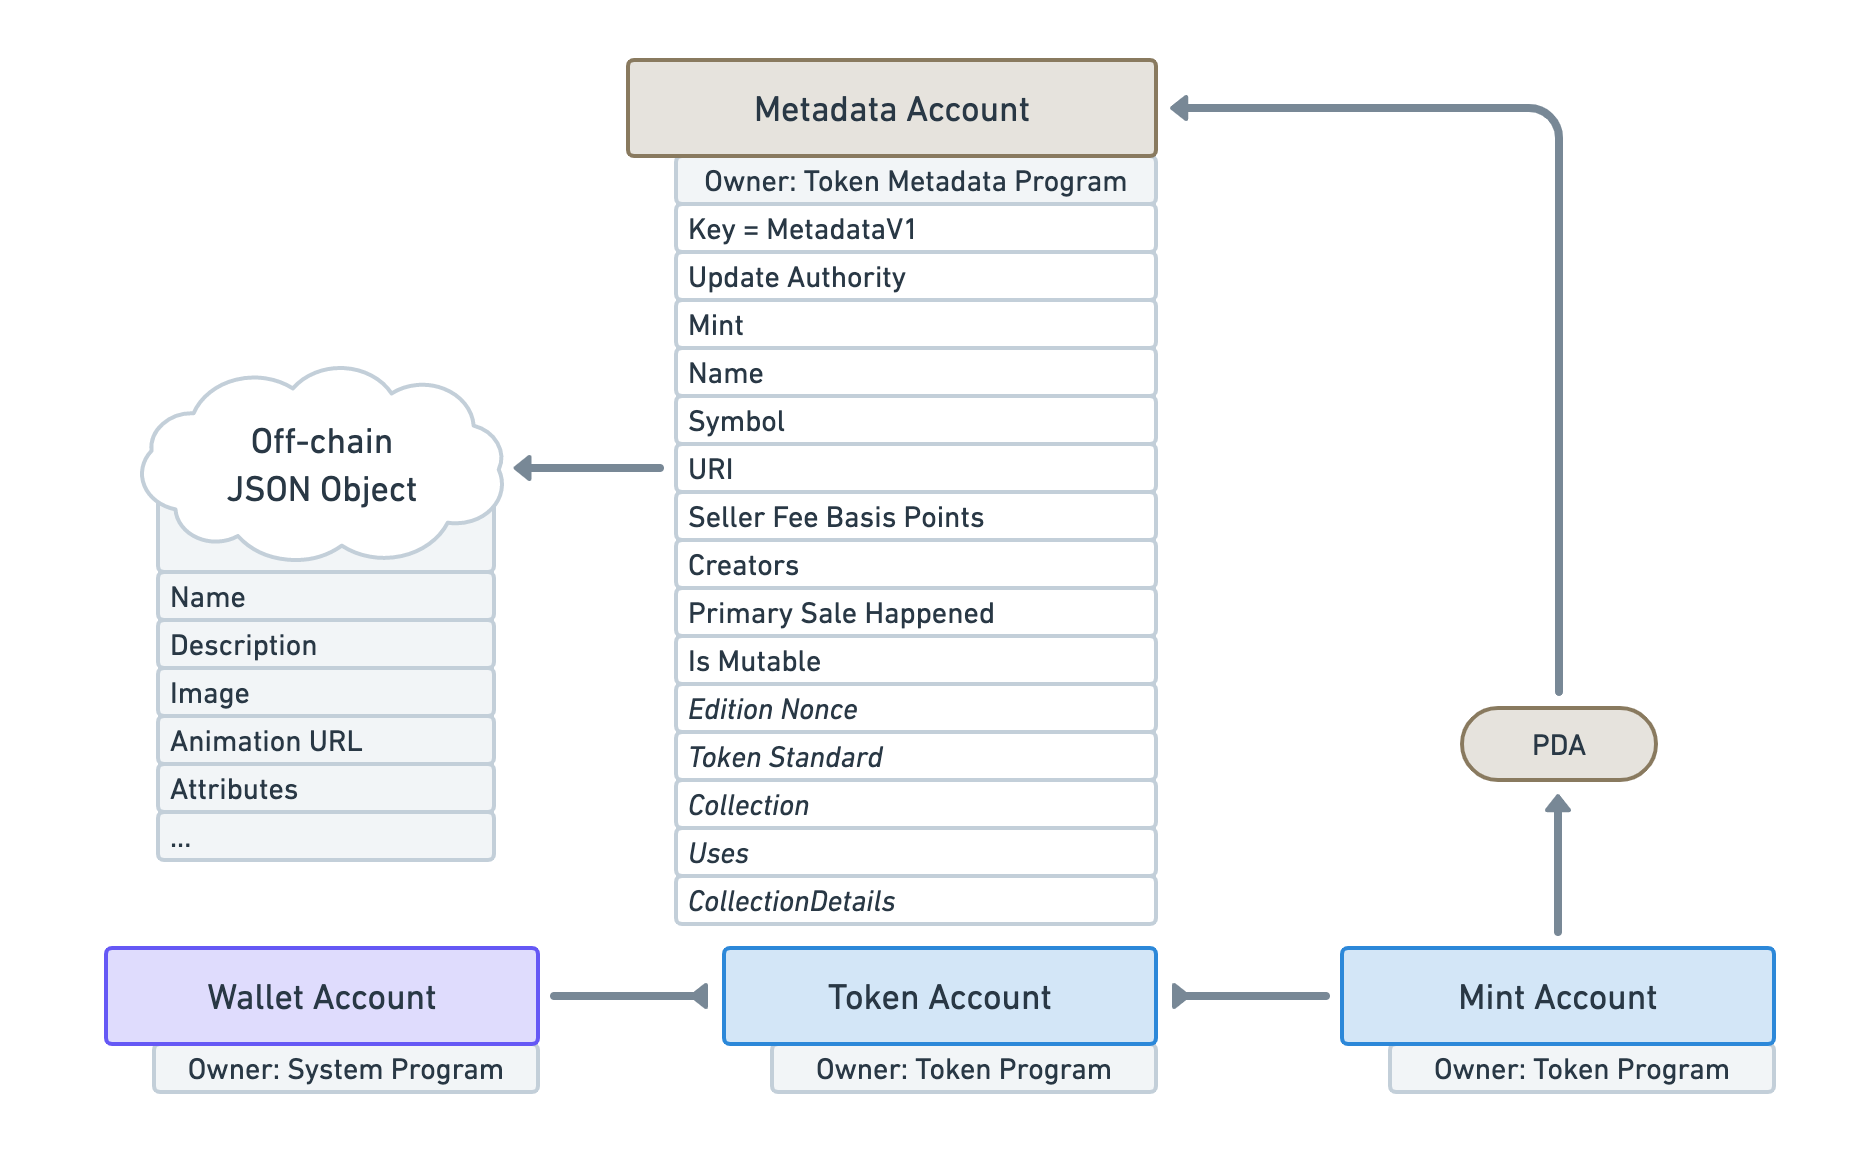
A Metadata account stores lots of useful information that Mint Accounts could not provide. This account also has a URI field which points to an off-chain JSON object. This object saves information like the image and attributes for an NFT.
The combination of the Token Program and the Token Metadata Program allows tokens to be categorised into three broad categories depending on two characteristics:
-
supply: the total number of tokens in circulation. -
decimal places: the number of decimals points a token is allowed to have. For example: SOL is allowed to have 9 decimal points, which means, 10^-9 SOL is a valid denomination and can be transferred between wallets.
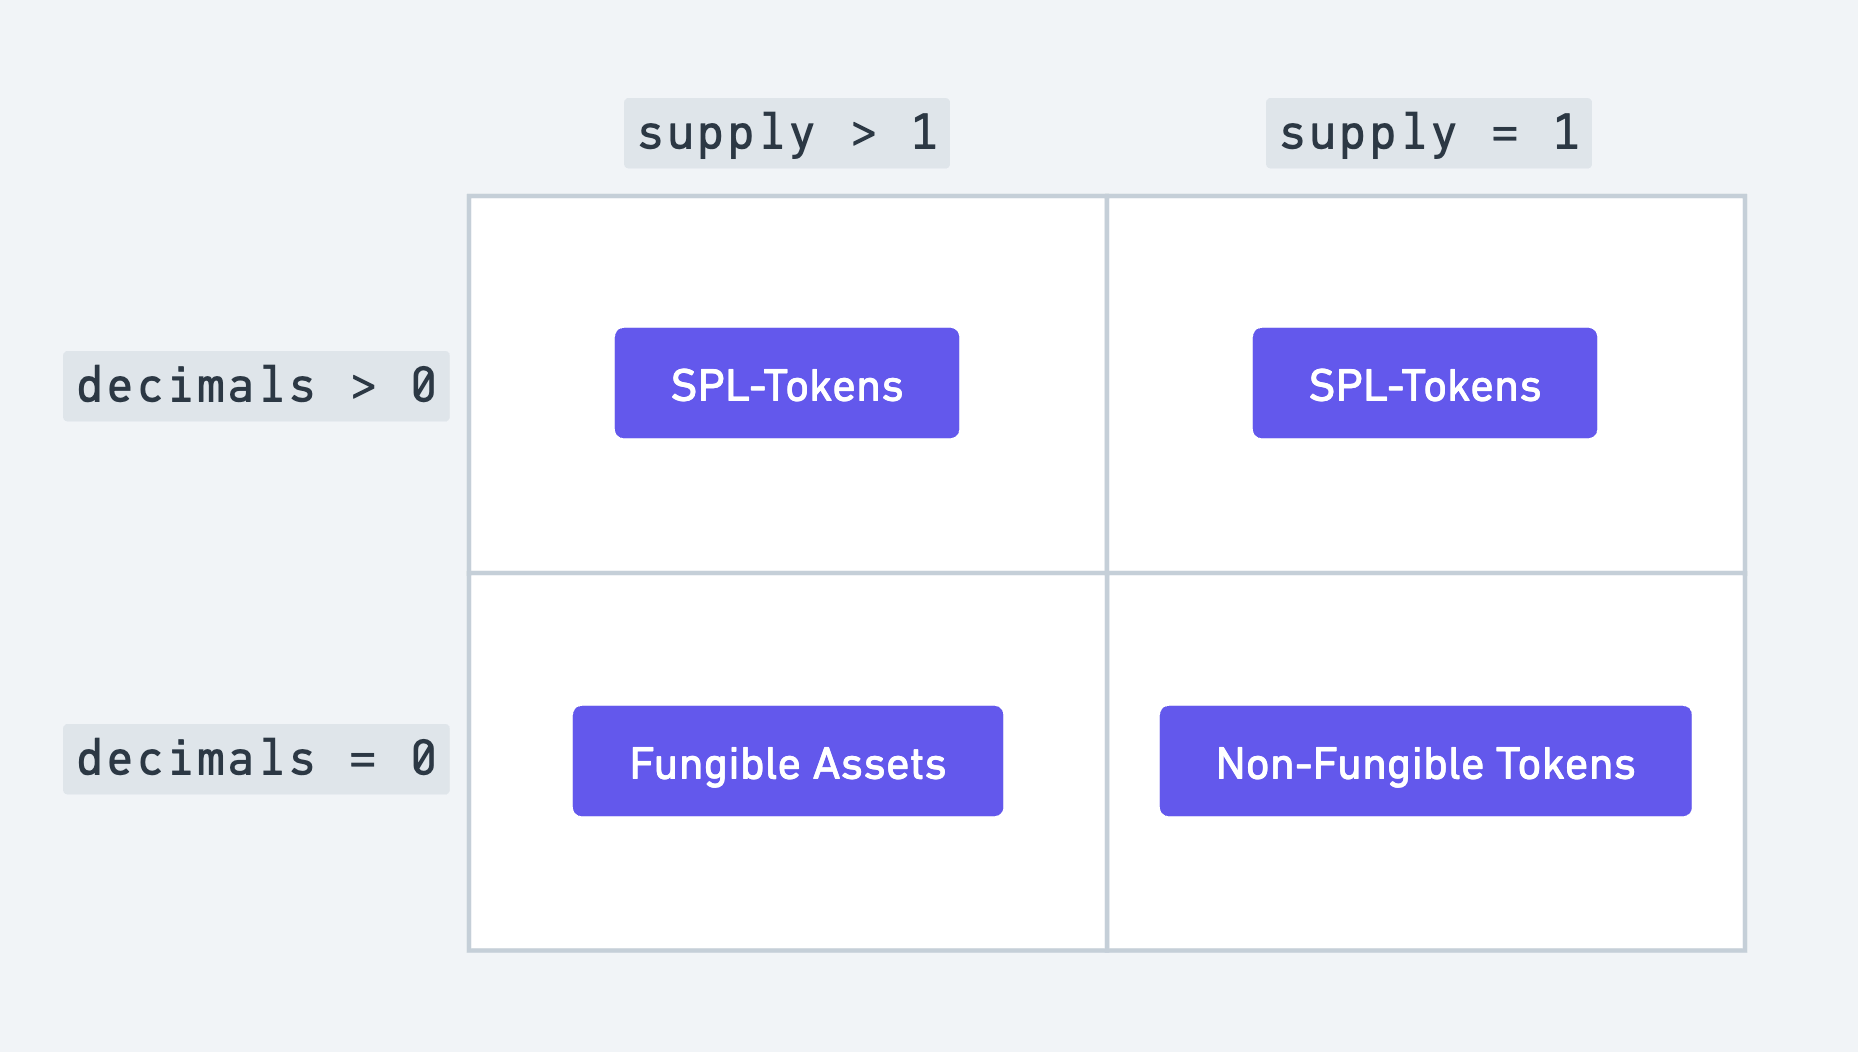
Fungible Tokens
Fungible tokens are based on the Solana Program Library (SPL) and are supported by SOL the same way ERC-20 tokens are supported by ETH. These tokens can be held in any quantity and can be freely mixed with others of the same mint, just like SOL, BTC, ETH and other cryptocurrencies.
SPL-tokens and their associated metadata can be generated on the CLI using Metaboss
metaboss create fungible -d <decimals> -m <metadata_file>
What sets the SPL-tokens apart are their characteristic of having:
-
supply> 1 -
decimal places> 0
We can see an example of such a token on Solscan as well. Lets check out DUST Protocol, which is a Fungible token on Solana.
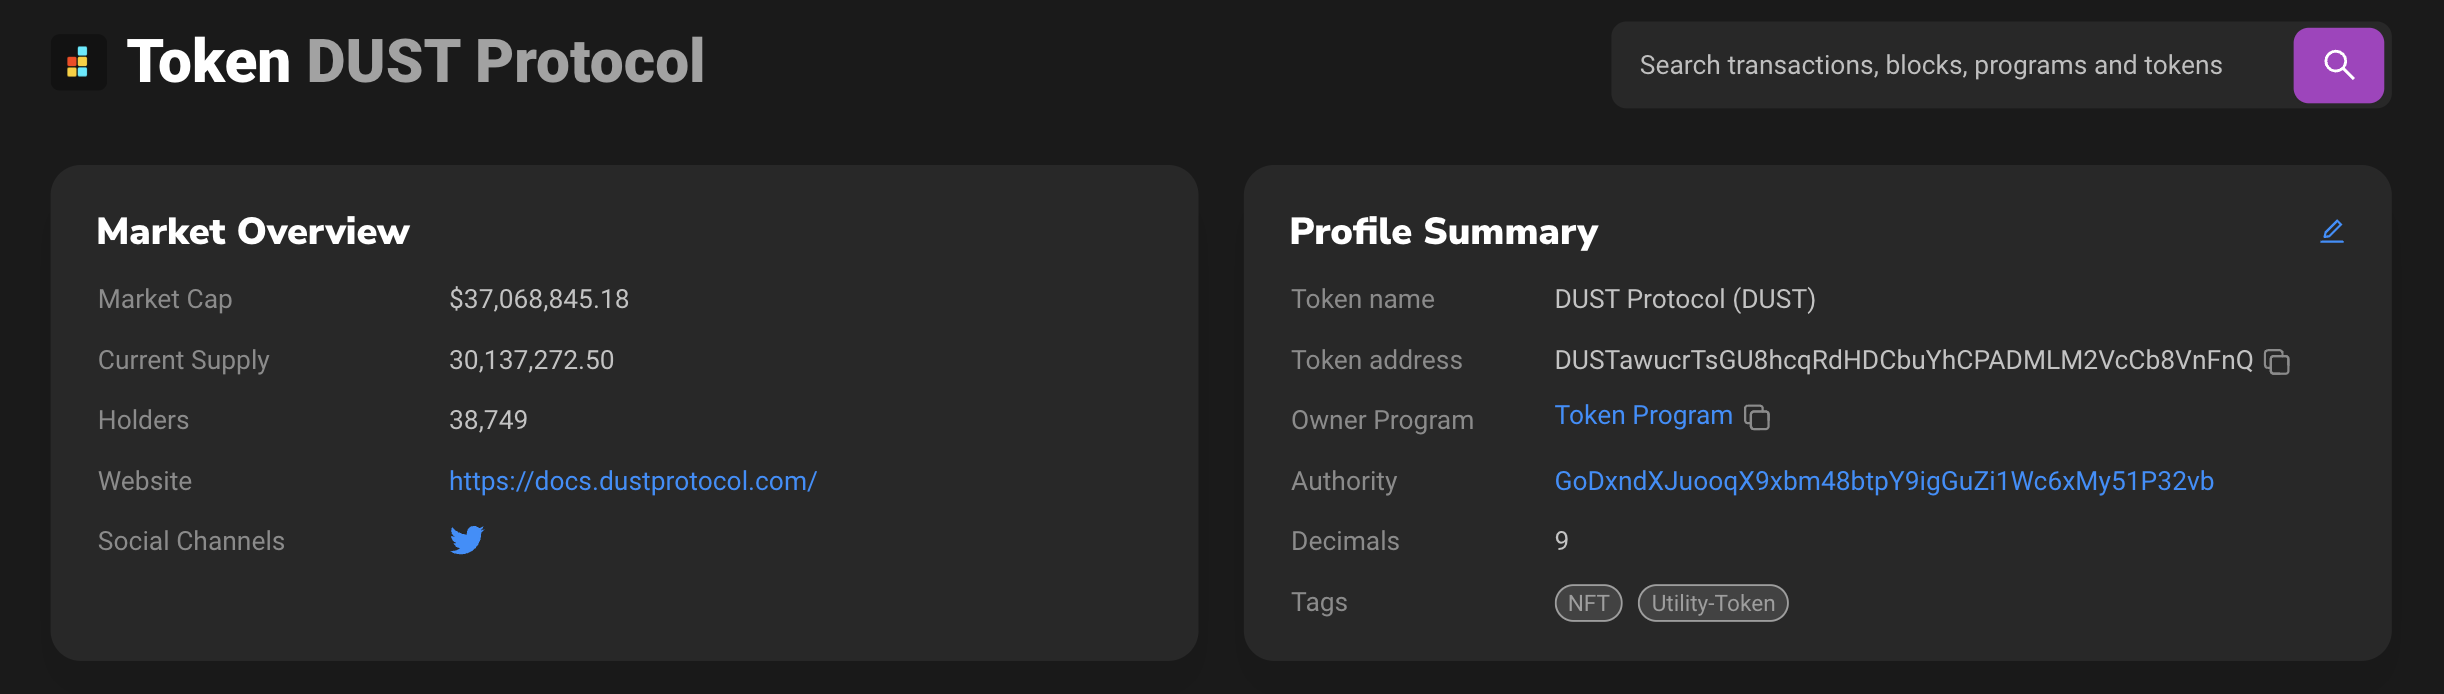
On the Profile Summary, we can see the token's name and address. We can also see that this account is owned by the Token Program, indicating that this is a Mint Account. Furthermore, we can see the authority of the token as well as the number of decimal places. On the Market Overview, we can see the supply which is > 1. The supply and decimal combination shows that the given token is a Fungible token.
Fungible assets
Fungible assets are tokens that have:
-
supply> 1 -
decimal places= 0
Having a supply greater than 1 but decimal places equal to 0 creates tokens that have very unique use-cases: gaming assets or utilities like a shield or a piece of wood. These assets with decimals equal to 0 can't be divided or fractionalised but are non-singular in supply, thus allowing distribution to a number of users.
Non-Fungible tokens (NFTs)
These tokens are the ones which have gained a lot of traction in this past year. NFTs are tokens that are non-replaceable / interchangeable. What this means is that there can not be more than one specimen of a given token. Every token is unique and can't be fractionalised. Here are their properties:
-
supply= 1 -
decimal places= 0
NFTs are usually represented by a visual asset: it could either be an image, video or gif. The asset could also be an mp3 file thus allowing the possibilities of music NFTs.
An example of an NFT on Solana can be seen here: Token Address 9abR69fFTMn8Vf86Zj8sufrobCyL2c8XoczmRALav9AF.
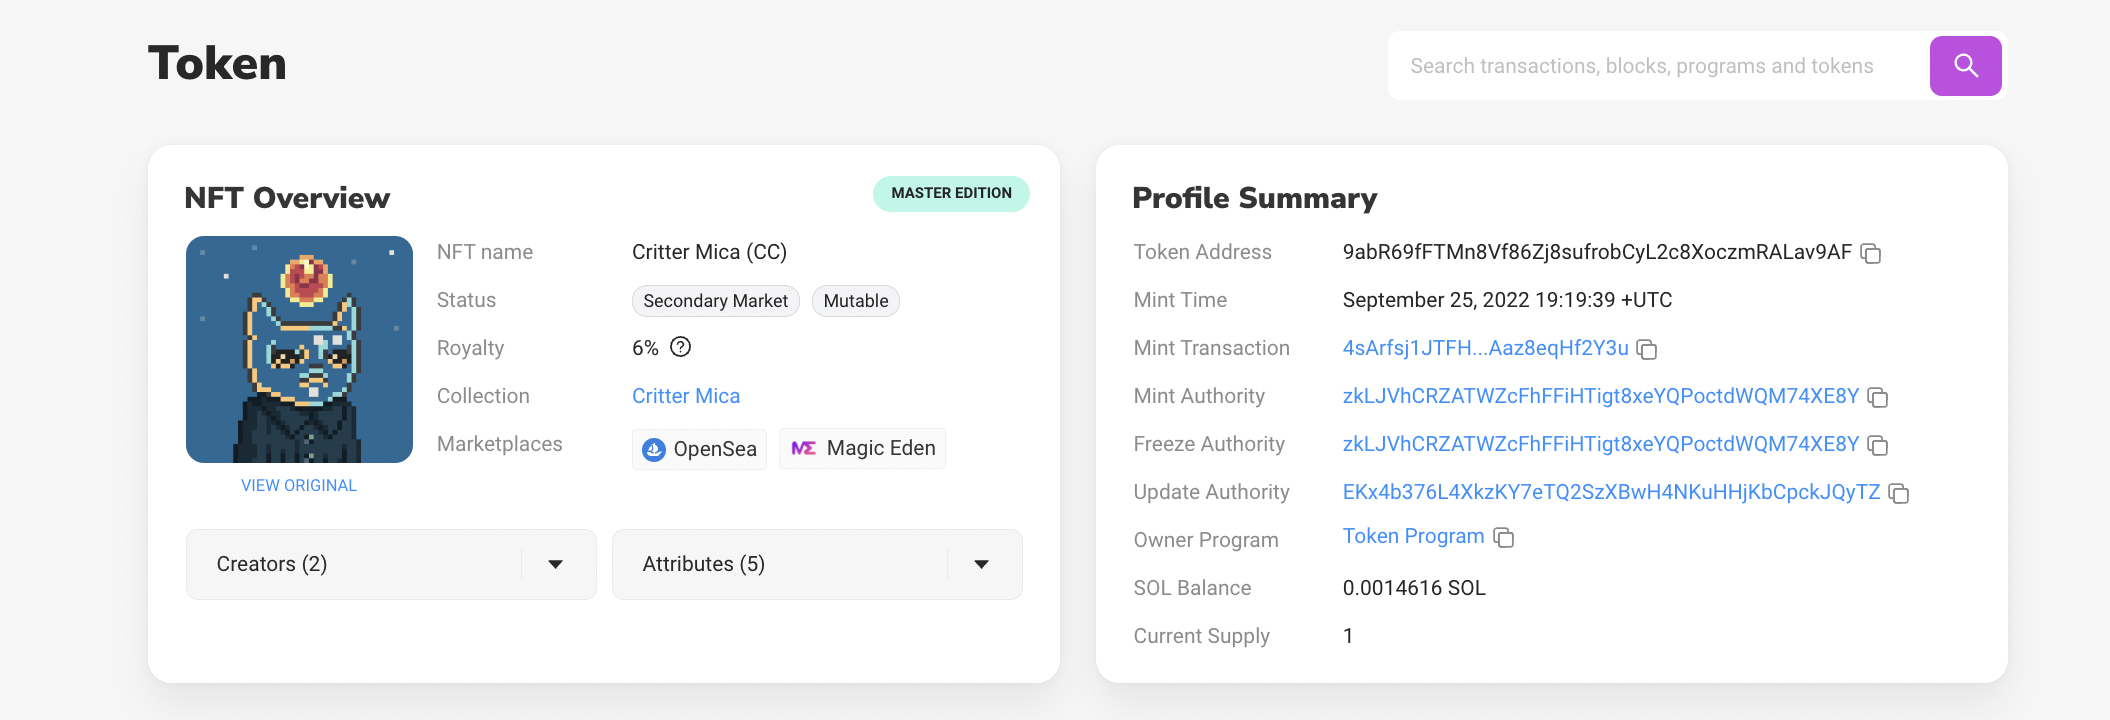
This NFT belongs to the well known Critters Cult Collection. In the NFT Overview section, we can see a Royalty set by the creator. This is a fee which is paid to the original creator of the NFT, on every trade of the given NFT. We can also see a Creators tab, which lists the addresses of the original creators of the collection and their corresponding percentages out of the total royalties they receive. On the Attributes tab, we can see some specific attributes of the NFT. These attributes vary across NFTs in the collection and hence give uniqueness to each NFT depending on the specific combinations of the attributes. In the Profile Summary, we can also see that the supply is 1, hence ensuring that its an NFT.
Let's check out the Metadata tab of the NFT which showcases some interesting information. There are two sets of metadata that we can see in this tab: on-chain and off-chain metadata.
Here's the on-chain metadata: https://solscan.io/token/9abR69fFTMn8Vf86Zj8sufrobCyL2c8XoczmRALav9AF#metadata
One can read more about how to mint an NFT and set the metadata for the NFTs on Metaplex docs.